Integrate Oracle Identity Manager (OIM) and Oracle Access Manager (OAM)
Oracle Fusion Applications Installation: Integrate Oracle Identity Manager (OIM) and Oracle Access Manager (OAM)
Previous: Configuring Oracle Identity and Access Management components
Important Note: This is OLD guide for old version 11.1.1.5. Please follow instructions at http://www.oratraining.com/blog/2012/12/oracle-fusion-applications-installation-step-by-step-guide-11-1-5/ for latest guide for current version i.e. 11.1.5
Preparing OAM for integration
Create a file named config_oam2.props as follows.
[oracle@fusion bin]$ more config_oam2.props
WLSHOST: fusion
WLSPORT: 7001
WLSADMIN: weblogic
WLSPASSWD: Oracle123
IDSTORE_HOST: fusion
IDSTORE_PORT: 3060
IDSTORE_BINDDN: cn=orcladmin
IDSTORE_USERNAMEATTRIBUTE: cn
IDSTORE_LOGINATTRIBUTE: uid
IDSTORE_USERSEARCHBASE: cn=Users,dc=localdomain
IDSTORE_SEARCHBASE: dc=localdomain
IDSTORE_GROUPSEARCHBASE: cn=Groups,dc=localdomain
IDSTORE_OAMSOFTWAREUSER: oamLDAP
IDSTORE_OAMADMINUSER: oamadmin
PRIMARY_OAM_SERVERS: fusion:5575
WEBGATE_TYPE: ohsWebgate10g
ACCESS_GATE_ID: Webgate_IDM
OAM11G_IDM_DOMAIN_OHS_HOST:false
OAM11G_IDM_DOMAIN_OHS_PORT:7777
OAM11G_IDM_DOMAIN_OHS_PROTOCOL:http
OAM11G_WG_DENY_ON_NOT_PROTECTED: false
OAM_TRANSFER_MODE: open
OAM11G_OAM_SERVER_TRANSFER_MODE:open
OAM11G_IDM_DOMAIN_LOGOUT_URLS: /console/jsp/common/logout.jsp,/em/targetauth/emaslogout.jsp
OAM11G_OIM_WEBGATE_PASSWD: Oracle123
OAM11G_SERVER_LOGIN_ATTRIBUTE: uid
COOKIE_DOMAIN: .localdomain
OAM11G_IDSTORE_ROLE_SECURITY_ADMIN: OAMAdministrators
OAM11G_SSO_ONLY_FLAG: true
OAM11G_OIM_INTEGRATION_REQ: true
OAM11G_IMPERSONATION_FLAG:true
OAM11G_SERVER_LBR_HOST:fusion
OAM11G_SERVER_LBR_PORT:7777
OAM11G_SERVER_LBR_PROTOCOL:http
COOKIE_EXPIRY_INTERVAL: 120
OAM11G_OIM_OHS_URL:http://fusion:7777/
[oracle@fusion bin]$ export ORACLE_HOME=/app/fusion/fmw/iam
[oracle@fusion bin]$ export IDM_HOME=/app/fusion/fmw/idm
[oracle@fusion bin]$ export MW_HOME=/app/fusion/fmw
[oracle@fusion bin]$ export JAVA_HOME=/app/fusion/jdk6
[oracle@fusion bin]$ cd /app/fusion/fmw/iam/idmtools/bin/
[oracle@fusion bin]$ ./idmConfigTool.sh -configOAM input_file=config_oam2.props
Enter ID Store Bind DN password :
Enter User Password for IDSTORE_PWD_OAMSOFTWAREUSER:
Confirm User Password for IDSTORE_PWD_OAMSOFTWAREUSER:
Enter User Password for IDSTORE_PWD_OAMADMINUSER:
Confirm User Password for IDSTORE_PWD_OAMADMINUSER:
The tool has completed its operation. Details have been logged to automation.log
Restart Weblogic Admin Server.
Create another file named user.props as follows.
[oracle@fusion bin]$ more user.props
IDSTORE_HOST: fusion
IDSTORE_PORT: 3060
IDSTORE_ADMIN_USER: cn=orcladmin
IDSTORE_USERSEARCHBASE: cn=Users,dc=localdomain
IDSTORE_GROUPSEARCHBASE: cn=Groups,dc=localdomain
PASSWORD_EXPIRY_PERIOD: 7300
[oracle@fusion bin]$ ./idmConfigTool.sh -upgradeLDAPUsersForSSO input_file=user.props
…
Enter Directory Type[OID]: OID
…
Finished parsing LDAP
LDAP Users Upgraded.
Remove Security Providers
If you have already configured signle sign-on for Administration Console then you must delete the security providers you created in that section. Otherwise this can be skipped since these providers will not be present. Still make sure that these do not exist.
1. Log in to the WebLogic Administration Console at:
http://fusion:7777/console
2. Click Security Realms from the Domain structure menu.
3. Click Lock and Edit in the Change Center.
4. Click myrealm.
5. Select the Providers tab.
Select the following providers:
OVDAuthenticator
OIDAuthenticator
OAMIDAssertor
6. Click Delete.
7. Click Yes to confirm deletion.
8. Restart the administration server and all managed servers if you had to delete the above otherwise you can continue to next step.
Integrate OIM and OAM
Create a new file named oimitg.props as follows.
[oracle@fusion bin]$ more oimitg.props
LOGINURI: /${app.context}/adfAuthentication
LOGOUTURI: /oamsso/logout.html
AUTOLOGINURI: None
ACCESS_SERVER_HOST: fusion
ACCESS_SERVER_PORT: 5575
ACCESS_GATE_ID: Webgate_IDM
COOKIE_DOMAIN: .localdomain
COOKIE_EXPIRY_INTERVAL: 120
OAM_TRANSFER_MODE: open
WEBGATE_TYPE: ohsWebgate10g
SSO_ENABLED_FLAG: true
IDSTORE_PORT: 3060
IDSTORE_HOST: fusion
IDSTORE_DIRECTORYTYPE: OID
IDSTORE_ADMIN_USER: cn=oamLDAP,cn=Users,dc=localdomain
IDSTORE_USERSEARCHBASE: cn=Users,dc=localdomain
IDSTORE_GROUPSEARCHBASE: cn=Groups,dc=localdomain
MDS_DB_URL: jdbc:oracle:thin:@fusion:1521:fusiondb
MDS_DB_SCHEMA_USERNAME: dev_mds
WLSHOST: fusion
WLSPORT: 7001
WLSADMIN: weblogic
DOMAIN_NAME: IDMDomain
OIM_MANAGED_SERVER_NAME: wls_oim1
DOMAIN_LOCATION: /app/fusion/admin/IDMDomain/aserver/IDMDomain
[oracle@fusion bin]$ ./idmConfigTool.sh -configOIM input_file=oimitg.props
Enter sso access gate password :
Enter mds db schema password :
Enter idstore admin password :
Enter admin server user password :
…
…
Changes Activated. Edit session ended.
Connection closed sucessfully
The tool has completed its operation. Details have been logged to automation.log
Have a look at the automation.log if there are any errors. There should not be any.
Restart Admin server and all managed servers.
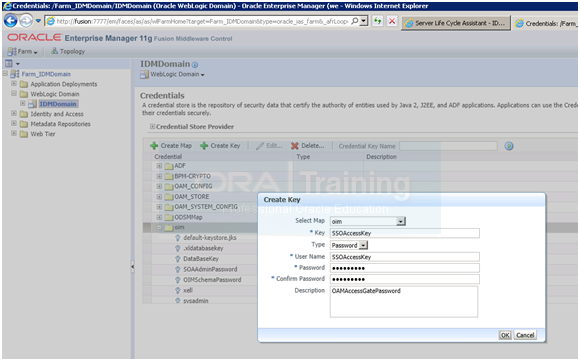
Manually Creating CSF Keys
1. Log into Oracle Enterprise Manager Fusion Middleware Control at:
http://fusion/em
2. Navigate to FARM_IDMDomain – Weblogic Domain
3. Click IDMDomain.
4. When the summary screen is displayed, select Security – Credentials from the list.
5. Click the credential key oim and click Create Key. Create the following keys:
SSOAccessKey
Field Value
Map oim
Key SSOAccessKey
Type Password
User Name SSOAccessKey
Password Value of OAM11G_OIM_WEBGATE_PASSWD
Description OAMAccessGatePassword
Before validating integration we must do the following.
Assigning IDM Administrators Group to Weblogic Administration Groups
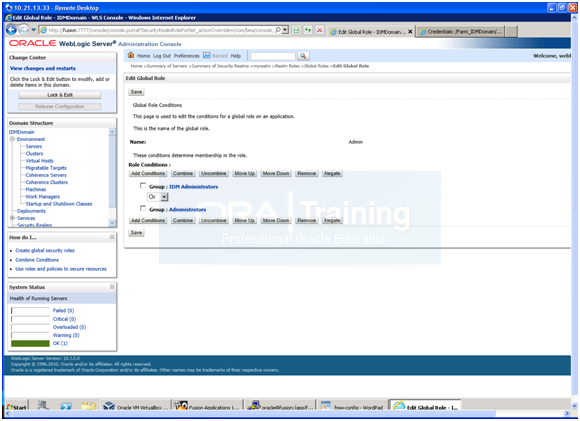
1. Log in to the WebLogic Administration Server Console.
2. In the left pane of the console, click Security Realms.
3. On the Summary of Security Realms page, click myrealm under the Realms table.
4. On the Settings page for myrealm, click the Roles & Policies tab.
5. On the Realm Roles page, expand the Global Roles entry under the Roles table.
This brings up the entry for Roles. Click the Roles link to go to the Global Roles page.
6. On the Global Roles page, click the Admin role to go to the Edit Global Role page:
a. On the Edit Global Roles page, under the Role Conditions table, click the Add Conditions button.
b. On the Choose a Predicate page, select Group from the drop down list for predicates and click Next.
c. On the Edit Arguments Page, Specify IDM Administrators in the Group Argument field and click Add.
7. Click Finish to return to the Edit Global Rule page.
8. The Role Conditions table now shows the IDM Administrators Group as an entry.
9. Click Save to finish adding the Admin role to the IDM Administrators Group.
10. Validate that the changes were successful by bringing up the WebLogic Administration Server Console using a web browser. Log in using the credentials for the weblogic_idm user.
Important Note: If you skip the above step then you may get following error while accessing fusion:7777/em with weblogic_idm user
“User is not authorized to login to WebLogic Domain. User should be part of one or more Administrative roles to be able to login.”

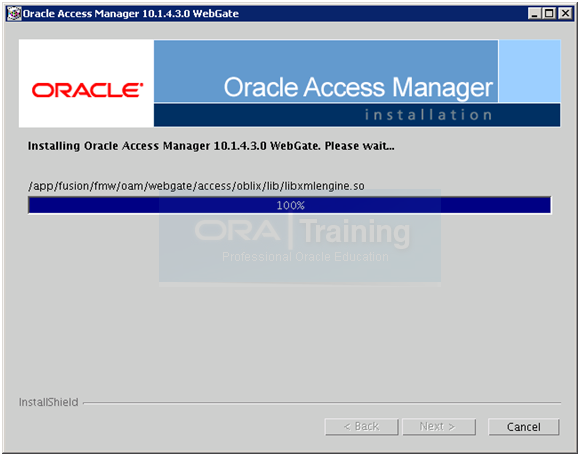
Install webgate
[oracle@fusion webgate]$ cd /mnt/fusion/installers/webgate
./Oracle_Access_Manager10_1_4_3_0_linux64_OHS11g_WebGate –gui
[Make sure you supply -gui argument]
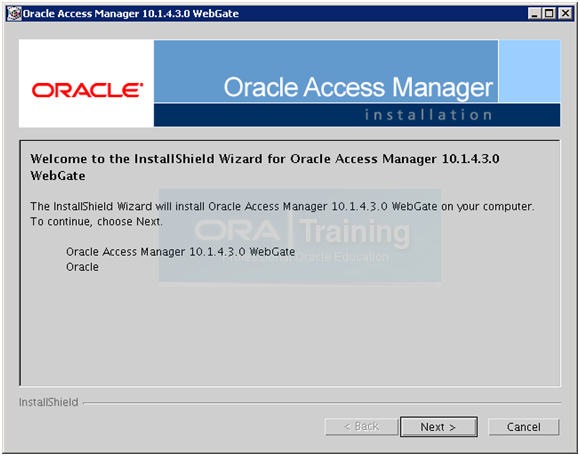
Welcome screen appears. Click Next
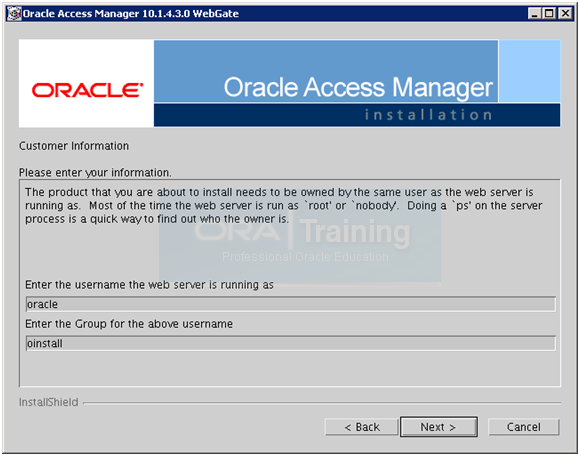
Enter Username as “oracle” and group “oinstall“. Click Next
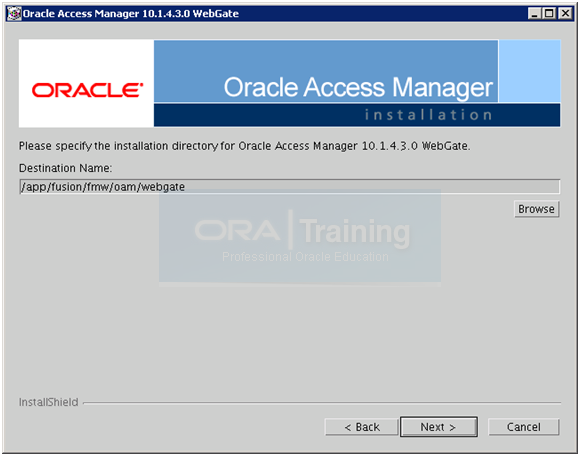
Enter the values as above and click Next
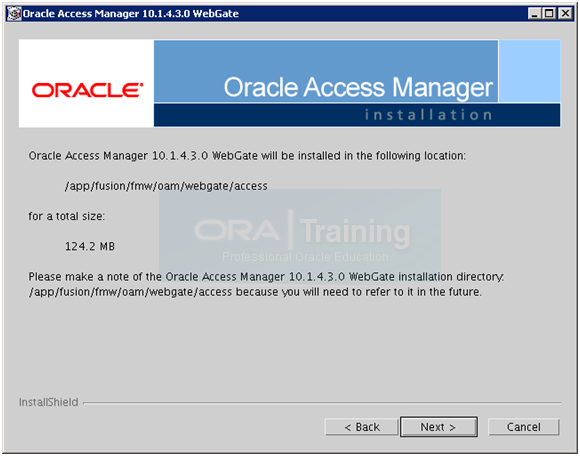
Review the above information and click Next
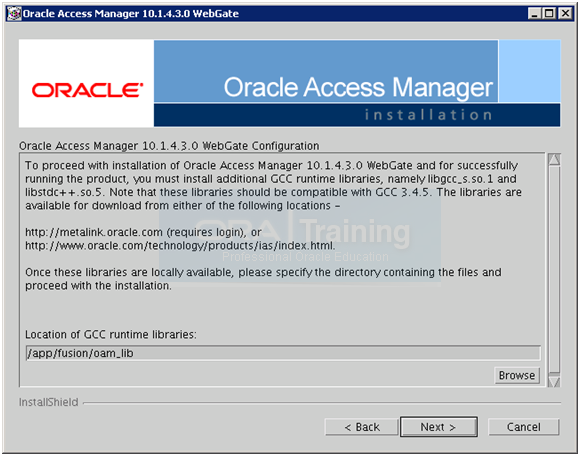
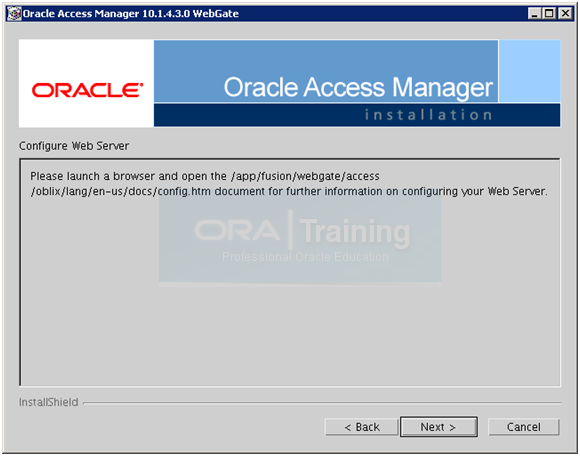
Supply the values as above but before clicking Next, open a new terminal window and execute following steps to create symbolic links in the desired directory.
[oracle@fusion oam_lib]$ mkdir /app/fusion/oam_lib
[oracle@fusion oam_lib]$ ln -s /usr/lib64/libstdc++.so.5 /app/fusion/oam_lib/libstdc++.so.5
[oracle@fusion oam_lib]$ ln -s /lib64/libgcc_s.so.1 /app/fusion/oam_lib/libgcc_s.so.1
Once done, click Next
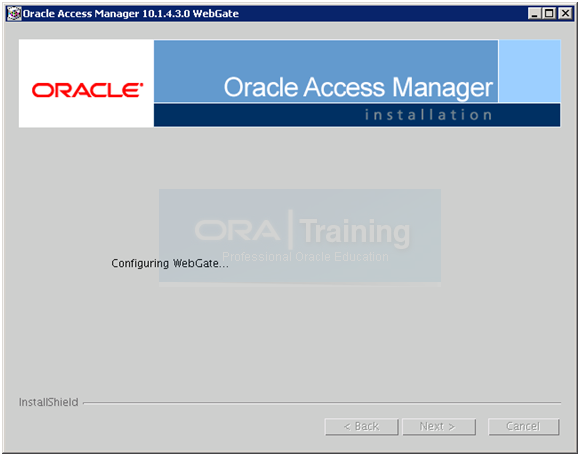
The installation will finish and will automatically take you to the next screen.
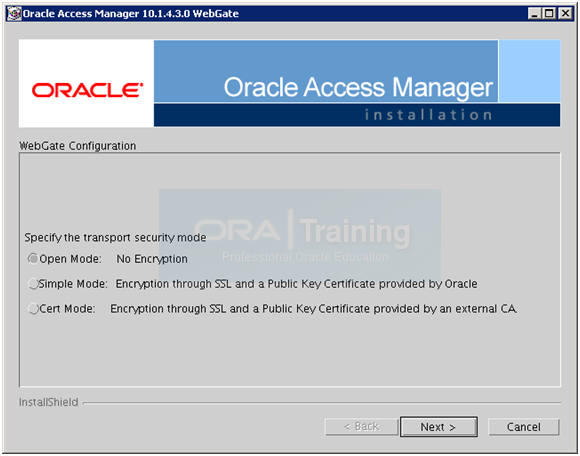
Select Open Mode and click Next
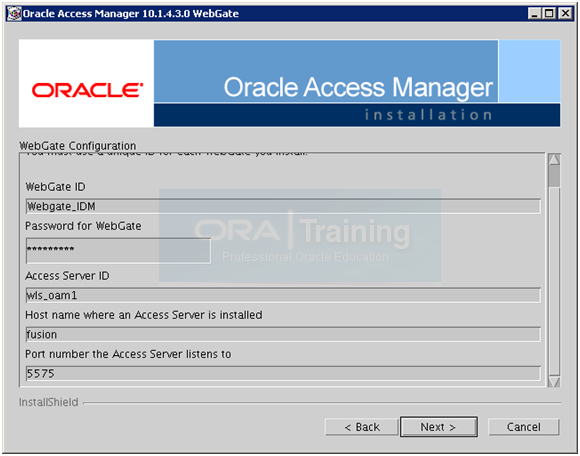
Enter the values as follows and click Next.
WebGate ID: Webgate_IDM
Password: Oracle123 (or any desired password)
Access Server ID: wls_oam1
Host name: fusion
Port number (proxy port): 5575
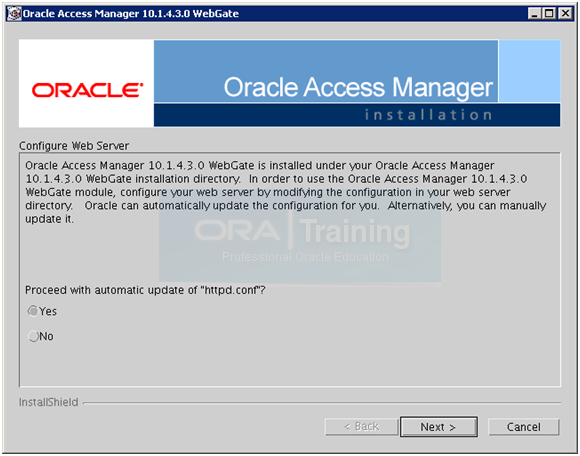
Select Yes to proceed with automatic update of httpd.conf with webgate parameters. Click Next
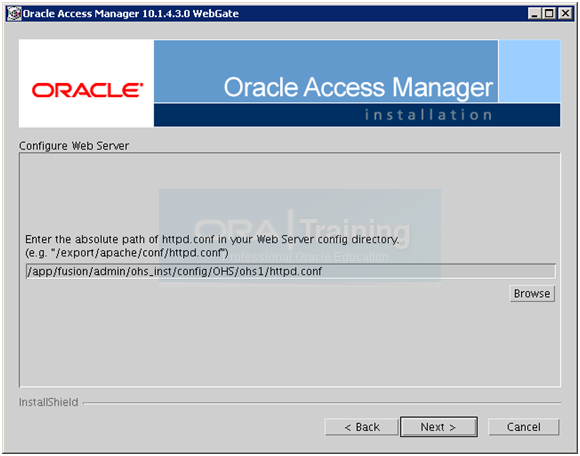
Specify the httpd.conf location from the OHS instance directory. You can take a backup of this file in another terminal window if you want. Click Next
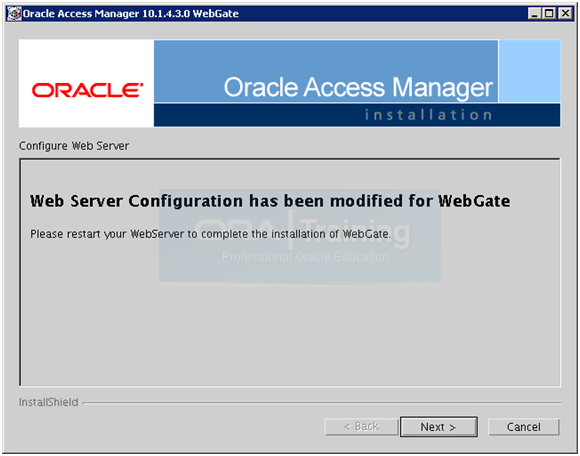
Click Next
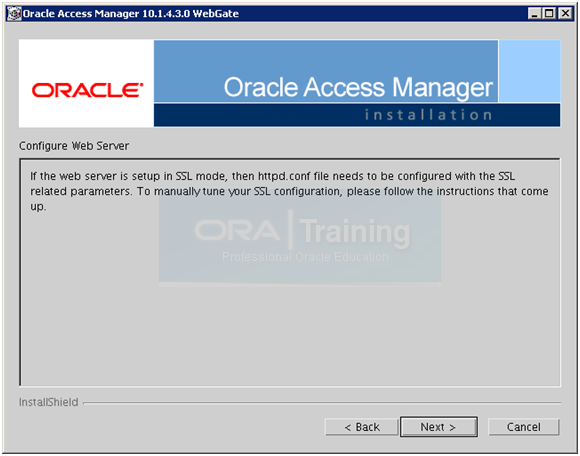
Click Next
Click Next
Click Next
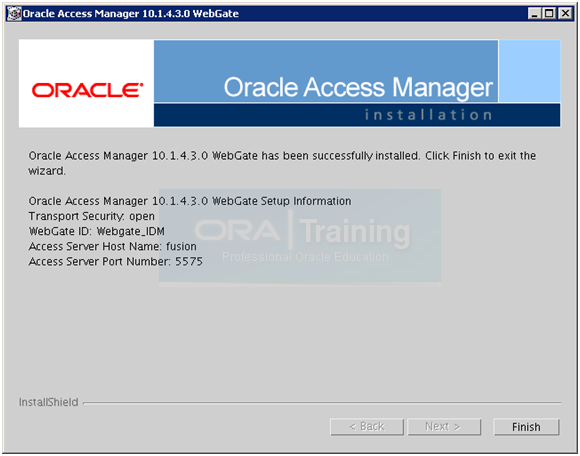
Click Finish to complete the installation.
Copy the following files to Webgate.
[oracle@fusion bin]$ cp -p /app/fusion/fmw/oam/webgate/access/oblix/lib/ObAccessClient.xml /app/fusion/fmw/oam/webgate/access/oblix/lib/ObAccessClient.xml.bak
[oracle@fusion bin]$ cp -p /app/fusion/admin/IDMDomain/aserver/IDMDomain/output/Webgate_IDM/ObAccessClient.xml /app/fusion/fmw/oam/webgate/access/oblix/lib/
[oracle@fusion Webgate_IDM]$ cd /app/fusion/admin/IDMDomain/aserver/IDMDomain/output/Webgate_IDM
[oracle@fusion Webgate_IDM]$ cp logout.html /app/fusion/fmw/oam/webgate/access/oamsso/
Comment out following lines from /app/fusion/admin/ohs_inst/config/OHS/ohs1/httpd.conf
#<LocationMatch “/oamsso/*”>
#Satisfy any
#</LocationMatch>
Restart HTTP server
This concludes the integration between OIM and OAM.
Next: Creating a New Provisioning Plan
Installing Oracle Fusion Applications – steps
- Installing Fusion Applications Provisioning Framework
- Installing Oracle 11g Database (Applications Transactional Database)
- Running Oracle Fusion Applications Repository Creation Utility (Applications RCU)
- Creating another database for Oracle Identity Management Infrastructure (optional)
- Running Repository Creation Utility (RCU) for Oracle Identity Management components
- Installing Oracle Identity and Access Management Components
- Configuring Oracle Identity and Access Management components
- Integrate Oracle Identity Manager (OIM) and Oracle Access Manager (OAM)
- Creating a New Provisioning Plan
- Provisioning an Applications Environment
Hi! ,
I figured it out, had to start the oid components from oid_inst1\bin\opmnctl
before starting the weblogic admin servers/managed servers.
I have added a new post today for this.
http://www.oratraining.com/blog/2012/11/startup-shutdown-sequence-for-oracle-fusion-apps-components/
Hi! Thank you very much for this very informative post on fusion install.
I followed the steps until Integrate Oracle Identity Manager (OIM) and Oracle Access Manager (OAM)
I had to restart the linux server, now trying to startup all components:
1) started database successfully
2) started ohs successfully
3) tried to start weblogic admin server failed due to security initialization exception – its looking for fusion:3060
4) tried to start the oid components from ods oracle_home using opmnctl only the emagent started
Can you please help me understand the startup sequence?
Hi Mansoor,
You can follow this sequence. I will put a quick new post for this since a lot of people are asking this.
Startup sequence
1. Source profile
more ~/.bash_profile
ORACLE_HOME=/app/fusion/database/product/11.2.0/dbhome_1
export ORACLE_HOME
ORACLE_SID=fusiondb
export ORACLE_SID
JAVA_HOME=/app/fusion/jdk6
export JAVA_HOME
PATH=$PATH:$ORACLE_HOME/bin
export PATH
2. Start Listener
lsnrctl start LISTENER_FUSIONDB
3. Start Database
sqlplus / as sysdba
SQL> startup
4. Start OID
/app/fusion/admin/oid1/bin/opmnctl startall
5. Start Web
/app/fusion/admin/ohs_inst1/bin/opmnctl startall
6. Start Weblogic Admin Server for IDMDomain
cd /app/fusion/admin/IDMDomain/aserver/IDMDomain/bin/
nohup ./startWebLogic.sh &
(Wait till you see RUNNING in nohup.out log file)
7. Start Node Manager
cd /app/fusion/fmw/wlserver_10.3/server/bin/
nohup ./startNodeManager.sh &
(Wait till you see “started on port 5556” in nohup.out log file)
8. Start OAM managed server for IDMDomain (since we cannot login to console without OAM)
cd /app/fusion/admin/IDMDomain/aserver/IDMDomain/bin/
nohup ./startManagedWebLogic.sh wls_oam1 &
(Wait till you see RUNNING in nohup.out log file)
9. Start remaining managed servers
Either from command prompt
cd /app/fusion/admin/IDMDomain/aserver/IDMDomain/bin/
nohup ./startManagedWebLogic.sh wls_ods1 &
nohup ./startManagedWebLogic.sh wls_oim1 &
nohup ./startManagedWebLogic.sh wls_soa1 &
(Wait till you see RUNNING in nohup.out log file for each of them. You can start them in in parallel, just make sure all start fine)
Or by logging into Weblogic Console->Servers->Control screen.
10. In case if restarting from postconfigure or later phase
cd /app/fusion/fusionapps/wlserver_10.3/common/nodemanager/ad002aph01
nohup ./startNodeManagerWrapper.sh &
Hi! Admin,
Thanks for the detailed start sequence.
I am still battling with fusion middleware configs – as I started with 11.1.4 version of fusion apps – with Linux 5.8.
Webgate 11g is shipped with 11.1.4 waiting patiently for you 11.1.4 steps.
Hi!,
Was able to go successfully proceed with provisioning Financials/procurement module until Configure-Secondary.
Provisioning step Postconfigure failed and restart (cleanup/Restore also failed) – fun starts now as there is not clear direction on manual cleanup found couple of vague metalink notes.
Cleanup ldap not sure why its needed – the provisioning should overwrite entries (thinking like create or replace mind).
Anyone with cleanup/restore experience please help.
@Help_ca,
Please note that cleanup of LDAP is required when you are restarting the installation after configure stage. We know it takes almost 30-40 minutes for this but at this release this is required. We already did an exercise by manually commenting the cleanup of LDAP in xml files but eventually it does create problem so better to let it be as it is. We know that this is frustrating but may be in future releases Oracle shall fix this.
Regards,
Ora Training Admin
Thanks Admin,
So looks like its better to backup the whole system after each successful completion of stage – even though there is no option to backup in the provisoning wizard.
I am thinking just killing provisioning – stopping all servers and taking a backup and resuming from where we left off.
BTW 11.1.5 release is out – hope it is better than 11.1.4.
My first read of release notes disappointed me as we have to patch all FMW homes extensively (I wish there is a patchmerge feature like the patch-merge feature of adpatch – used it a lot during recent R12 upgrade Gig).
./idmConfigTool.sh -configOAM input_file=config_oam2.props
Fails with this error
SEVERE: Error while configuring webgate and domain
java.lang.NullPointerException
at oracle.idm.automation.impl.oam.handlers.OAM11gIntegrationHandler.configOAM11gIdStore(OAM11gIntegrationHandler.java:368)
at oracle.idm.automation.impl.oam.handlers.OAM11gIntegrationHandler.execute(OAM11gIntegrationHandler.java:696)
at oracle.idm.automation.AutomationTool.configOAM(AutomationTool.java:593)
at oracle.idm.automation.AutomationTool.parseCmdLine(AutomationTool.java:218)
at oracle.idm.automation.AutomationTool.main(AutomationTool.java:132)
Hi,
Can you kindly give the steps to integrate OAM 11g with Trust Association Interceptor (TAI) using reverse proxy method please?
We tried the steps given in the following link http://docs.oracle.com/cd/E21764_01/upgrade.1111/e17852/manage_was_oamiap.htm but authentication happens and fails at authorization. We used OAMs default login page for authentication. After authentication, the application custom login page is thrown by TAI for authentication. We found from the trace that oracle.security.was.providers.tai.OAMTrustAssociationInterceptorImpl is not getting loaded. The jars are in the location suggested by Oracle but not sure why it failed to load. We are also sceptical on the values that need to go in oamtai.xml particularly for the tags resource, truststore, keystore. For resource,we gave the value as “/” and for trustore & keystore, we generated a new one through IBM Console and provided the location of those files path in the XML.
Our environment is OAM 11g, Webgate 10g, Websphere Application Server (WAS) 6.1 NDM, IBM HTTP Server
Hi admin,
Thank you for your effort to prepare this blog, especially the installation and configuration on IDM and webgate.
I can install and start the fusion apps in my testing instance.
Hello ,
I follow all the steps as you mention till Install Webgate and when I was installing the webgate I got error while creating the configuration fro webgate. and then I check the EM all targets shows “Pending” but when I check in the console all are up. Can you please let me know what is the reason and how to fix that, I restarts all the managed server and admin sever along with restart http server, but unable to resolve the issue.
firstly it look like HTTP server is down but when I check OPMNCTL for ods, ohs, oid all are alive.
Please do help me to come out from this.
Thanks
RK
@sreedhar
Did you resolve this issue?
Hello,
Can anyone look into my issues please?
Thanks
Sreedhar
Hi,
I have found below error in “automation.log” file when I ran “./idmConfigTool.sh -configOAM input_file=config_oam2.props” for
configuring the OAM for OIM integration in the first step of this chapter.
“Error while configuring User ID Store {1}”
Can you please let us know why we are getting this error? What are the steps we need to resolve this issue.
Thanks,
Sreedhar
Below is the content from “automation.log”:
=========================================
Apr 12, 2012 6:39:11 AM oracle.idm.automation.util.Util setLogger
WARNING: Logger initialized in warning mode
Apr 12, 2012 6:39:18 AM oracle.idm.automation.impl.oam.handlers.OAM11gIntegrationHandler execute
FINER: ENTRY
Apr 12, 2012 6:40:17 AM oracle.idm.automation.impl.oam.handlers.OAM11gIntegrationHandler configOAM11gIdStore
FINER: ENTRY
Apr 12, 2012 6:40:17 AM oracle.idm.automation.impl.oam.handlers.OAM11gIntegrationHandler configOIMIntegration
FINER: Creating mbean connection
Apr 12, 2012 6:40:18 AM oracle.idm.automation.impl.oam.handlers.OAM11gIntegrationHandler configOIMIntegration
FINER: Created mbean connection
Apr 12, 2012 6:40:18 AM oracle.idm.automation.impl.oam.handlers.OAM11gUtil getFoundationConfigMBean
FINER: ENTRY
Apr 12, 2012 6:40:18 AM oracle.idm.automation.impl.oam.handlers.OAM11gUtil getFoundationConfigMBean
FINER: RETURN com.oracle.oam:Location=AdminServer,name=OamWLST,type=oam.wlst,Application=oam_admin,ApplicationVersion=11.1.1.3.0
Apr 12, 2012 6:40:18 AM oracle.idm.automation.impl.oam.handlers.OAM11gIntegrationHandler configOIMIntegration
FINER: Invoking mbean
Apr 12, 2012 6:40:19 AM oracle.idm.automation.impl.oam.handlers.OAM11gIntegrationHandler configOAM11gIdStore
SEVERE: Error while configuring User ID Store {1}
Apr 12, 2012 6:40:19 AM oracle.idm.automation.impl.oam.handlers.OAM11gIntegrationHandler configOAMIntegration
FINER: mbean invocation success.
Apr 12, 2012 6:40:19 AM oracle.idm.automation.impl.oam.handlers.OAM11gIntegrationHandler configOIMIntegration()
FINER: RETURN
Apr 12, 2012 6:40:19 AM oracle.idm.automation.impl.oam.handlers.OAM11gIntegrationHandler configOAM11gFAProperties
FINER: ENTRY
Apr 12, 2012 6:40:19 AM oracle.idm.automation.impl.oam.handlers.OAM11gIntegrationHandler configOAM11gFAProperties
FINER: Creating mbean connection
Apr 12, 2012 6:40:19 AM oracle.idm.automation.impl.oam.handlers.OAM11gIntegrationHandler configOAM11gFAProperties
FINER: Created mbean connection
Apr 12, 2012 6:40:19 AM oracle.idm.automation.impl.oam.handlers.OAM11gUtil getFoundationConfigMBean
FINER: ENTRY
Apr 12, 2012 6:40:19 AM oracle.idm.automation.impl.oam.handlers.OAM11gUtil getFoundationConfigMBean
FINER: RETURN com.oracle.oam:Location=AdminServer,name=OamWLST,type=oam.wlst,Application=oam_admin,ApplicationVersion=11.1.1.3.0
Apr 12, 2012 6:40:19 AM oracle.idm.automation.impl.oam.handlers.OAM11gIntegrationHandler configOAM11gFAProperties
FINER: Invoking mbean
Apr 12, 2012 6:40:20 AM oracle.idm.automation.impl.oam.handlers.OAM11gIntegrationHandler configOAM11gFAProperties
FINER: RETURN
Apr 12, 2012 6:40:20 AM oracle.idm.automation.impl.oam.handlers.OAM11gIntegrationHandler configOAM11gIdStore
FINER: ENTRY
Apr 12, 2012 6:40:20 AM oracle.idm.automation.impl.oam.handlers.OAM11gIntegrationHandler configOIMIntegration
FINER: Creating mbean connection
Apr 12, 2012 6:40:20 AM oracle.idm.automation.impl.oam.handlers.OAM11gIntegrationHandler configOIMIntegration
FINER: Created mbean connection
Apr 12, 2012 6:40:20 AM oracle.idm.automation.impl.oam.handlers.OAM11gUtil getFoundationConfigMBean
FINER: ENTRY
Apr 12, 2012 6:40:20 AM oracle.idm.automation.impl.oam.handlers.OAM11gUtil getFoundationConfigMBean
FINER: RETURN com.oracle.oam:Location=AdminServer,name=OamManagement,type=oam.management,Application=oam_admin,ApplicationVersion=11.1.1.3.0
Apr 12, 2012 6:40:20 AM oracle.idm.automation.impl.oam.handlers.OAM11gIntegrationHandler configOIMIntegration
FINER: Invoking mbean
Apr 12, 2012 6:40:20 AM oracle.idm.automation.impl.oam.handlers.OAM11gIntegrationHandler configOAMIntegration
FINER: mbean invocation success.
Apr 12, 2012 6:40:20 AM oracle.idm.automation.impl.oam.handlers.OAM11gIntegrationHandler configOIMIntegration()
FINER: RETURN
Apr 12, 2012 6:40:20 AM oracle.idm.automation.impl.oam.handlers.OAM11gIntegrationHandler createDumpParams
FINE: OAM11gIntegrationHandler : createDumpParams()
Apr 12, 2012 6:40:20 AM oracle.idm.automation.impl.oam.handlers.OAM11gIntegrationHandler execute
FINER: RETURN
Apr 12, 2012 6:40:20 AM oracle.idm.automation.AutomationTool dumpConfig
INFO: Configuration details have been dumped to the file idmDomainConfig.param
=================================================
@krishnan
As we have mentioned in the post itself we need to comment out all following lines in httpd.conf after configuring webgate.
Following should be the final look of the file. (With comments)
#<LocationMatch “/oamsso/*”>
#Satisfy any
#</LocationMatch>
In httpd.conf file do we need to commen the lines like below?
#
#Satisfy any
#
or commend out the lines like below?
Satisfy any