Installing 11g Release 2 Real Application Clusters (11gR2 RAC) on Linux x86-64 Virtual Machine (VM) – Step by step installation guide
Today we will see how we can install 11g Release 2 RAC database on 2 Linux 64 bit Virtual Machines using VMWare or Oracle VirtualBox
Please note that we will need 2 Virtual Machines each with 2.5 GB of RAM. So if you have sufficient memory on your laptop/PC or server then you can host both VMs in same box or you can use 2 boxes which are connected to each other via local network.
Hardware requirements:
Processor with dual core or more
2.5 GB dedicated RAM for each VM
20 GB space for each VM
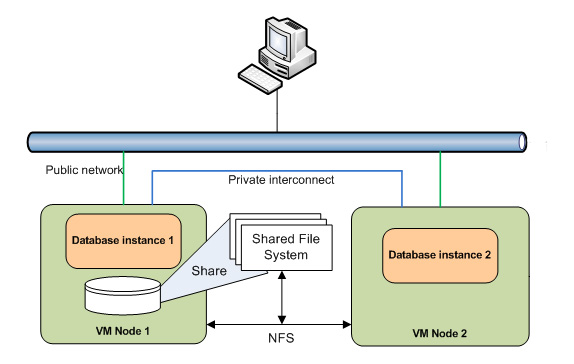
Since we are not using shared storage for Virtual Machines, we are sharing disks via NFS from one node to another. Here is how the VMs can be represented. Please note that this is not recommended for production setup, this is just for demo installation on Virtual Machines for learning purpose. For production we must use external storage on SAN or NAS storage.
Note: We also have plug and play type ready to use Virtual Machines also for those who want to learn or explore Oracle RAC without hassles of installing and configuring. Use the link on the top of this page to get these VMs if you want to skip the installation steps and directly start learning/exploring Oracle RAC technology.
For all others you can follow this guide to setup the VMs on your own. Please feel free to contact me if you face any issues using the installation guide. Also feel free to help fellow users by sharing the knowledge in comments section.
Following are the steps involved to achieve this.
1. Create Virtual Machine and install 64 bit Linux (generic step from previous post, not specific to this guide)
Please note that since we had already published document for installing Linux x86-64 on Virtual Machine using VMWare, I will not create a duplicate post here. Please refer to the same post except the hostname should be dbhost1 and full name is dbhost1.paramlabs.com. Also you can install Linux 5.9 instead of 5.7 The reason we have not installed Oracle Linux 6.x is that for using 6.x, we must upgrade the database to 11.2.0.3 while 5.x works fine with both 11.2.0.1 and 11.2.0.3. This gives us a flexibility to choose 11.2.0.1 initially and then upgrade to learn the upgrade process.
2. Add additional virtual Ethernet card and perform prerequisites in Linux
3. Copy/clone this virtual machine to create second node and modify host details
4. Setup shared file system and other pre-requisites
6. Install Oracle Database software and create RAC database
Please click respective link to go directly to the required step. Each page is having links to previous and next step as well as above list to directly jump to another step (except the first step since it is an older post)
Happy learning !!
Tushar
please share link to download these packages for Linux x86-64 .
glibc-devel-32bit-2.9-13.2
libgcc43-4.3.3_20081022
libstdc++43-4.3.3_20081022-11.18
gcc-32bit-4.3
libaio-32bit-0.3.104
libaio-devel-32bit-0.3.104
libstdc++43-32bit-4.3.3_20081022
Dear Admin
I have not kernel related parameter , i m stuck at perform requisites check
following error are currently displaying
1 os kernel parameter :file.max
2 os kernel parameter :ip_local_port_range
3 os kernel parameter :wmem_max
network time protocol(NTP)
kindly give me the kernel realted parameter for the installation.
thanks in Advance.
Dear Sohan,
Though you can manually also set them but did you try “Fix and try again” option in the wizard? It will run the script as root user and fix the settings.
Regard
Tushar
Great blog! Thanks for the informational post! I would recommend your blog as one of the top informational oracle training blogs! Keep up the great work and check out my blog, coming soon: