Installing 12c RAC on Linux VM: Setup shared file system and other pre-requisites
Previous: Copy/clone this virtual machine to create second node and modify host details
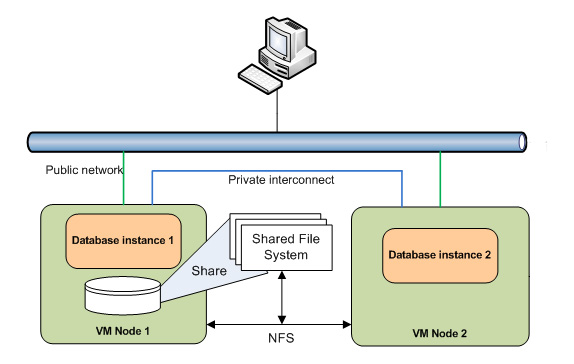
Now we need to setup shared file system for these nodes since having shared storage is a must for Oracle RAC
Since we are not using any external storage, NAS or SAN, we will host the shared file system on node 1 and share the same with node 2 using NFS. This is not recommended for production but since we are not using external storage for VMs this is the best way to achieve shared file system.
Note: Please do not use VMWare’s shared folders option since it is not cluster-aware and cannot make sure that read/writes from multiple hosts are handled properly. This can cause cluster panic so use NFS only for this VM purpose. Also we are not using VirtualBox shared disk option since we want to keep it generic in nature.
Since we are not using shared storage for Virtual Machines, we are sharing disks via NFS from one node to another. Here is how the VMs can be represented.
Login to Node 1 using root user. Please note that these steps are ONLY to be done on Node 1, not on node 2.
Let us first create the directories which will host the shared data.
[root@dbhost1 ~]# mkdir /shared_1
[root@dbhost1 ~]# mkdir /shared_2
[root@dbhost1 ~]# mkdir /shared_3
[root@dbhost1 ~]# chown grid:dba /shared_1
[root@dbhost1 ~]# chown grid:dba /shared_2
[root@dbhost1 ~]# chown grid:dba /shared_3
[root@dbhost1 ~]# chmod g+w /shared_1
[root@dbhost1 ~]# chmod g+w /shared_2
[root@dbhost1 ~]# chmod g+w /shared_3
Now we need to enable these directories to be shared over NFS. Enter following details in /etc/exports file
You will need uid and guid for user grid. You can find it by executing “id” command while logged in as “grid” user.
[grid@dbhost1 ~]# id
uid=54322(grid) gid=54322(dba) groups=54322(dba),54323(oinstall)
[root@dbhost1 ~]# more /etc/exports
/shared_1 *(rw,sync,no_root_squash,insecure,anonuid=54322,anongid=54322)
/shared_2 *(rw,sync,no_root_squash,insecure,anonuid=54322,anongid=54322)
/shared_3 *(rw,sync,no_root_squash,insecure,anonuid=54322,anongid=54322)
Check if NFS service is running. If not we need to start it.
[root@ dbhost1~]# service nfs status
rpc.mountd is stopped
nfsd is stopped
rpc.rquotad is stopped
[root@ dbhost1~]# chkconfig nfs on
[root@ dbhost1~]# service nfs start
Starting NFS services: [ OK ]
Starting NFS quotas: [ OK ]
Starting NFS daemon: [ OK ]
Starting NFS mountd: [ OK ]
Stopping RPC idmapd: [ OK ]
Starting RPC idmapd: [ OK ]
These above steps have enabled the newly created shared directories for NFS mount.
Now following steps need to be done on both Node 1 and Node 2
“Append” following entries in /etc/fstab file
[root@dbhost1 ~]# tail -3 /etc/fstab
nfshost:/shared_1 /u01 nfs rw,bg,hard,nolock,noac,nointr,tcp,vers=3,timeo=600,rsize=32768,wsize=32768,actimeo=0 0 0
nfshost:/shared_2 /u02 nfs rw,bg,hard,nolock,noac,nointr,tcp,vers=3,timeo=600,rsize=32768,wsize=32768,actimeo=0 0 0
nfshost:/shared_3 /u03 nfs rw,bg,hard,nolock,noac,nointr,tcp,vers=3,timeo=600,rsize=32768,wsize=32768,actimeo=0 0 0
[root@dbhost2 ~]# tail -3 /etc/fstab
nfshost:/shared_1 /u01 nfs rw,bg,hard,nolock,noac,nointr,tcp,vers=3,timeo=600,rsize=32768,wsize=32768,actimeo=0 0 0
nfshost:/shared_2 /u02 nfs rw,bg,hard,nolock,noac,nointr,tcp,vers=3,timeo=600,rsize=32768,wsize=32768,actimeo=0 0 0
nfshost:/shared_3 /u03 nfs rw,bg,hard,nolock,noac,nointr,tcp,vers=3,timeo=600,rsize=32768,wsize=32768,actimeo=0 0 0
Let us mount each of these shared directories to the mount points created earlier. This is not required to be done from next restart since system will automatically mount them based on /etc/fstab entries.
[root@dbhost1 ~]# mount /u01
[root@dbhost1 ~]# mount /u02
[root@dbhost1 ~]# mount /u03
Same on node 2
[root@dbhost2 ~]# mount /u01
[root@dbhost2 ~]# mount /u02
[root@dbhost2 ~]# mount /u03
Confirm if these directories are mounted correctly.
[root@dbhost1 ~]# df -h
Filesystem Size Used Avail Use% Mounted on
/dev/mapper/VolGroup00-LogVol00
283G 4.6G 264G 2% /
/dev/sda1 99M 41M 53M 44% /boot
tmpfs 1002M 0 1002M 0% /dev/shm
nfshost:/shared_1 283G 4.6G 264G 2% /u01
nfshost:/shared_2 283G 4.6G 264G 2% /u02
nfshost:/shared_3 283G 4.6G 264G 2% /u03
Same on node 2
[root@dbhost2 ~]# df -h
Filesystem Size Used Avail Use% Mounted on
/dev/mapper/VolGroup00-LogVol00
283G 4.6G 264G 2% /
/dev/sda1 99M 41M 53M 44% /boot
tmpfs 1002M 0 1002M 0% /dev/shm
nfshost:/shared_1 283G 4.6G 264G 2% /u01
nfshost:/shared_2 283G 4.6G 264G 2% /u02
nfshost:/shared_3 283G 4.6G 264G 2% /u03
As I said, next time when you restart, automatically these directories will be mounted,
IMPORTANT NOTE: Whenever you are restarting both servers, make sure that you let Node 1 start properly before starting Node 2. The reason being, the shared file system is hosted on Node 1 so if node 2 starts before node 1 has enabled NFS share during startup, the mount points will not come up on Node 2. This will especially be a problem once our clusterware and RAC database are installed.
Setting up user-equivalence on both nodes (Passwordless SSH setup)
Having passwordless ssh connectivity is a must for RAC installation. This is required for both nodes to communicate with each other and passing commands to each node during runtime and maintenance.
We will setup user-equivalence for both oracle and grid users. Let us start with grid owner user grid first.
Perform following on Node1
We will use all 4 combinations every time. i.e. dbhost1, dbhost1.paramlabs.com (fully qualified domain name), dbhost2, dbhost2.paramlabs.com
[grid@dbhost1 ~]$ ssh grid@dbhost2
The authenticity of host ‘dbhost2 (192.168.1.122)’ can’t be established.
RSA key fingerprint is
Are you sure you want to continue connecting (yes/no)? yes
Warning: Permanently added ‘dbhost2,192.168.1.122’ (RSA) to the list of known hosts.
grid@dbhost2’s password:
[grid@dbhost2 ~]$ exit
logout
Connection to dbhost2 closed.
[grid@dbhost1 ~]$ ssh grid@dbhost1
The authenticity of host ‘dbhost1 (192.168.1.121)’ can’t be established.
RSA key fingerprint is
Are you sure you want to continue connecting (yes/no)? yes
Warning: Permanently added ‘dbhost1,192.168.1.121’ (RSA) to the list of known hosts.
grid@dbhost1’s password:
[grid@dbhost1 ~]$ exit
logout
Connection to dbhost1 closed.
[grid@dbhost1 ~]$ ssh grid@dbhost1.paramlabs.com
The authenticity of host ‘dbhost1.paramlabs.com (192.168.1.121)’ can’t be established.
RSA key fingerprint is
Are you sure you want to continue connecting (yes/no)? yes
Warning: Permanently added ‘dbhost1.paramlabs.com’ (RSA) to the list of known hosts.
grid@dbhost1.paramlabs.com’s password:
[grid@dbhost1 ~]$ ssh grid@dbhost2.paramlabs.com
The authenticity of host ‘dbhost2.paramlabs.com (192.168.1.122)’ can’t be established.
RSA key fingerprint is
Are you sure you want to continue connecting (yes/no)? yes
Warning: Permanently added ‘dbhost2.paramlabs.com’ (RSA) to the list of known hosts.
grid@dbhost2.paramlabs.com’s password:
Last login: Mon Jul 8 13:24:19 2013 from dbhost1.paramlabs.com
[grid@dbhost1 ~]$ ssh-keygen -t dsa
Generating public/private dsa key pair.
Enter file in which to save the key (/home/grid/.ssh/id_dsa):
Enter passphrase (empty for no passphrase):
Enter same passphrase again:
Your identification has been saved in /home/grid/.ssh/id_dsa.
Your public key has been saved in /home/grid/.ssh/id_dsa.pub.
The key fingerprint is:
xxxxxx grid@dbhost1.paramlabs.com
[grid@dbhost1 ~]$ ls -ltr /home/grid/.ssh/
total 12
-rw-r–r– 1 grid dba 1612 Jul 8 13:25 known_hosts
-rw-r–r– 1 grid dba 616 Jul 8 13:26 id_dsa.pub
-rw——- 1 grid dba 668 Jul 8 13:26 id_dsa
[grid@dbhost2 ~]$ ssh-keygen -t dsa
Generating public/private dsa key pair.
Enter file in which to save the key (/home/grid/.ssh/id_dsa):
Created directory ‘/home/grid/.ssh’.
Enter passphrase (empty for no passphrase):
Enter same passphrase again:
Your identification has been saved in /home/grid/.ssh/id_dsa.
Your public key has been saved in /home/grid/.ssh/id_dsa.pub.
The key fingerprint is:
xxxx grid@dbhost2.paramlabs.com
[grid@dbhost2 ~]$ ls -ltr /home/grid/.ssh
total 8
-rw-r–r– 1 grid dba 616 Jul 8 13:28 id_dsa.pub
-rw——- 1 grid dba 668 Jul 8 13:28 id_dsa
[grid@dbhost1 ~]$ scp /home/grid/.ssh/id_dsa.pub grid@dbhost2:/home/grid/.ssh/authorized_keys
grid@dbhost2’s password:
id_dsa.pub 100% 616 0.6KB/s 00:00
[grid@dbhost2 ~]$ scp /home/grid/.ssh/id_dsa.pub grid@dbhost1:/home/grid/.ssh/authorized_keys
The authenticity of host ‘dbhost1 (192.168.1.121)’ can’t be established.
RSA key fingerprint is
Are you sure you want to continue connecting (yes/no)? yes
Warning: Permanently added ‘dbhost1,192.168.1.121’ (RSA) to the list of known hosts.
grid@dbhost1’s password:
id_dsa.pub 100% 616 0.6KB/s 00:00
[grid@dbhost1 ~]$ cat /home/grid/.ssh/id_dsa.pub >> /home/grid/.ssh/authorized_keys
[grid@dbhost2 ~]$ cat /home/grid/.ssh/id_dsa.pub >> /home/grid/.ssh/authorized_keys
Now let us test the passwordless connectivity between these 2 nodes using grid user. It should not prompt for password. In that case the test will be successful.
[grid@dbhost1 ~]$ ssh grid@dbhost1
Last login: Mon Jul 8 13:30:02 2013 from dbhost2.paramlabs.com
[grid@dbhost1 ~]$ exit
logout
Connection to dbhost1 closed.
[grid@dbhost1 ~]$ ssh grid@dbhost2
Last login: Mon Jul 8 13:30:10 2013 from dbhost2.paramlabs.com
[grid@dbhost2 ~]$ exit
logout
Connection to dbhost2 closed.
[grid@dbhost1 ~]$ ssh grid@dbhost1.paramlabs.com
Last login: Mon Jul 8 13:31:38 2013 from dbhost1.paramlabs.com
[grid@dbhost1 ~]$ exit
logout
Connection to dbhost1.paramlabs.com closed.
[grid@dbhost1 ~]$ ssh grid@dbhost2.paramlabs.com
Last login: Mon Jul 8 13:31:41 2013 from dbhost1.paramlabs.com
[grid@dbhost2 ~]$ exit
logout
Connection to dbhost2.paramlabs.com closed.
Let’s do the same on dbhost2
[grid@dbhost2 ~]$ ssh grid@dbhost1
Last login: Mon Jul 8 13:31:46 2013 from dbhost1.paramlabs.com
[grid@dbhost1 ~]$ exit
logout
Connection to dbhost1 closed.
[grid@dbhost2 ~]$ ssh grid@dbhost2
Last login: Mon Jul 8 13:31:50 2013 from dbhost1.paramlabs.com
[grid@dbhost2 ~]$ exit
logout
Connection to dbhost2 closed.
[grid@dbhost2 ~]$ ssh grid@dbhost1.paramlabs.com
The authenticity of host ‘dbhost1.paramlabs.com (192.168.1.121)’ can’t be established.
RSA key fingerprint is
Are you sure you want to continue connecting (yes/no)? yes
Warning: Permanently added ‘dbhost1.paramlabs.com’ (RSA) to the list of known hosts.
Last login: Mon Jul 8 13:32:09 2013 from dbhost2.paramlabs.com
[grid@dbhost1 ~]$ exit
logout
Connection to dbhost1.paramlabs.com closed.
[grid@dbhost2 ~]$ ssh grid@dbhost2.paramlabs.com
The authenticity of host ‘dbhost2.paramlabs.com (192.168.1.122)’ can’t be established.
RSA key fingerprint is
Are you sure you want to continue connecting (yes/no)? yes
Warning: Permanently added ‘dbhost2.paramlabs.com’ (RSA) to the list of known hosts.
Last login: Mon Jul 8 13:32:11 2013 from dbhost2.paramlabs.com
[grid@dbhost2 ~]$ exit
logout
Connection to dbhost2.paramlabs.com closed.
This concludes passwordless ssh setup for grid user. Let us do the same exercise for oracle user.
Let us generate public key for dbhost1. Accept defaults and press enter whenever prompted.
[oracle@dbhost1 ~]$ ssh-keygen -t dsa
Generating public/private dsa key pair.
Enter file in which to save the key (/home/oracle/.ssh/id_dsa):
Enter passphrase (empty for no passphrase):
Enter same passphrase again:
Your identification has been saved in /home/oracle/.ssh/id_dsa.
Your public key has been saved in /home/oracle/.ssh/id_dsa.pub.
The key fingerprint is:
xxxxx oracle@dbhost1.paramlabs.com
Now let us generate public key for dbhost2. Accept defaults and press enter whenever prompted.
[oracle@dbhost2 ~]$ ssh-keygen -t dsa
Generating public/private dsa key pair.
Enter file in which to save the key (/home/oracle/.ssh/id_dsa):
Created directory ‘/home/oracle/.ssh’.
Enter passphrase (empty for no passphrase):
Enter same passphrase again:
Your identification has been saved in /home/oracle/.ssh/id_dsa.
Your public key has been saved in /home/oracle/.ssh/id_dsa.pub.
The key fingerprint is:
xxxxx oracle@dbhost2.paramlabs.com
[oracle@dbhost1 ~]$ ls -ltr /home/oracle/.ssh/
total 8
-rw-r–r– 1 oracle oinstall 618 Jul 8 19:55 id_dsa.pub
-rw——- 1 oracle oinstall 672 Jul 8 19:55 id_dsa
[oracle@dbhost2 ~]$ ls -ltr /home/oracle/.ssh/
total 8
-rw-r–r– 1 oracle oinstall 618 Jul 8 19:55 id_dsa.pub
-rw——- 1 oracle oinstall 668 Jul 8 19:55 id_dsa
Now we need to copy this public key to second host in order to authorize it to connect to this host using this (oracle) user without password. We will save this public key in a file named authorized_keys on node 2.
[oracle@dbhost1~]$ cd /home/oracle/.ssh/
[oracle@dbhost1 .ssh]$ scp id_dsa.pub oracle@dbhost2:/home/oracle/.ssh/authorized_keys
The authenticity of host ‘dbhost2 (192.168.1.122)’ can’t be established.
RSA key fingerprint is
Are you sure you want to continue connecting (yes/no)? yes
Warning: Permanently added ‘dbhost2,192.168.1.122’ (RSA) to the list of known hosts.
oracle@dbhost2’s password:
id_dsa.pub
[oracle@dbhost2 ~]$ cd /home/oracle/.ssh/
[oracle@dbhost2 ~]$ scp id_dsa.pub oracle@dbhost1:/home/oracle/.ssh/authorized_keys
The authenticity of host ‘dbhost1 (192.168.1.121)’ can’t be established.
RSA key fingerprint is
Are you sure you want to continue connecting (yes/no)? yes
Warning: Permanently added ‘dbhost1,192.168.1.121’ (RSA) to the list of known hosts.
oracle@dbhost1’s password:
id_dsa.pub 100% 618 0.6KB/s 00:00
Also we will append the public key for dbhost1 to itself as well so that it can do ssh to samebox without password (2 of the 4 combinations)
[oracle@dbhost1 .ssh]$ cat id_dsa.pub >> authorized_keys
[oracle@dbhost2 .ssh]$ cat id_dsa.pub >> authorized_keys
Now let us test the passwordless connectivity between these 2 nodes using oracle user.
[oracle@dbhost1 .ssh]$ ssh oracle@dbhost1
The authenticity of host ‘dbhost1 (192.168.1.121)’ can’t be established.
RSA key fingerprint is
Are you sure you want to continue connecting (yes/no)? yes
Warning: Permanently added ‘dbhost1,192.168.1.121’ (RSA) to the list of known hosts.
Last login: Mon Jul 8 19:54:43 2013 from 192.168.1.181
[oracle@dbhost1 ~]$ exit
logout
Connection to dbhost1 closed.
[oracle@dbhost1 .ssh]$ ssh oracle@dbhost2
Last login: Mon Jul 8 19:54:49 2013 from 192.168.1.181
[oracle@dbhost2 ~]$ exit
logout
Connection to dbhost2 closed.
[oracle@dbhost1 .ssh]$ ssh oracle@dbhost1.paramlabs.com
The authenticity of host ‘dbhost1.paramlabs.com (192.168.1.121)’ can’t be established.
RSA key fingerprint is a
Are you sure you want to continue connecting (yes/no)? yes
Warning: Permanently added ‘dbhost1.paramlabs.com’ (RSA) to the list of known hosts.
Last login: Mon Jul 8 19:58:48 2013 from dbhost1.paramlabs.com
[oracle@dbhost1 ~]$ exit
logout
Connection to dbhost1.paramlabs.com closed.
[oracle@dbhost1 .ssh]$ ssh oracle@dbhost2.paramlabs.com
The authenticity of host ‘dbhost2.paramlabs.com (192.168.1.122)’ can’t be established.
RSA key fingerprint is
Are you sure you want to continue connecting (yes/no)? yes
Warning: Permanently added ‘dbhost2.paramlabs.com’ (RSA) to the list of known hosts.
Last login: Mon Jul 8 19:58:51 2013 from dbhost1.paramlabs.com
[oracle@dbhost2 ~]$ exit
logout
Connection to dbhost2.paramlabs.com closed.
Now do the similar steps on Node 2 (dbhost2)
[oracle@dbhost2 .ssh]$ ssh oracle@dbhost1
Last login: Mon Jul 8 19:58:57 2013 from dbhost1.paramlabs.com
[oracle@dbhost1 ~]$ exit
logout
Connection to dbhost1 closed.
[oracle@dbhost2 .ssh]$ ssh oracle@dbhost2
The authenticity of host ‘dbhost2 (192.168.1.122)’ can’t be established.
RSA key fingerprint is
Are you sure you want to continue connecting (yes/no)? yes
Warning: Permanently added ‘dbhost2,192.168.1.122’ (RSA) to the list of known hosts.
Last login: Mon Jul 8 19:59:02 2013 from dbhost1.paramlabs.com
[oracle@dbhost2 ~]$ exit
logout
Connection to dbhost2 closed.
[oracle@dbhost2 .ssh]$ ssh oracle@dbhost1.paramlabs.com
The authenticity of host ‘dbhost1.paramlabs.com (192.168.1.121)’ can’t be established.
RSA key fingerprint is
Are you sure you want to continue connecting (yes/no)? yes
Warning: Permanently added ‘dbhost1.paramlabs.com’ (RSA) to the list of known hosts.
Last login: Mon Jul 8 19:59:17 2013 from dbhost2.paramlabs.com
[oracle@dbhost1 ~]$ exit
logout
Connection to dbhost1.paramlabs.com closed.
[oracle@dbhost2 .ssh]$ ssh oracle@dbhost2.paramlabs.com
The authenticity of host ‘dbhost2.paramlabs.com (192.168.1.122)’ can’t be established.
RSA key fingerprint is
Are you sure you want to continue connecting (yes/no)? yes
Warning: Permanently added ‘dbhost2.paramlabs.com’ (RSA) to the list of known hosts.
Last login: Mon Jul 8 19:59:20 2013 from dbhost2.paramlabs.com
[oracle@dbhost2 ~]$ exit
logout
Connection to dbhost2.paramlabs.com closed.
Next: Install Oracle Grid Infrastructure
1. Create Virtual Machine and install 64 bit Linux
2. Add additional virtual Ethernet card and perform prerequisites in Linux
3. Copy/clone this virtual machine to create second node and modify host details
4. Setup shared file system and other pre-requisites
5. Install Oracle Grid Infrastructure
6. Install Oracle Database software and create RAC database
Recent Comments