Perform Post-Provisioning Configuration
Installing Oracle Fusion Applications > Setting up Identity and Access Management Node > Perform Post-Provisioning Configuration
Previous: Provision Identity Management
Pro Oracle Fusion Applications – Installation and Administration
Now you can buy the first and only comprehensive book on Oracle Fusion Applications Installation and Administration which covers end to end information on introduction, planning, installation and troubleshooting guides for implementing Fusion Applications on premise. Buy it now from any of the following stores.
http://www.amazon.com/Pro-Oracle-Fusion-Applications-Administration/dp/1484209842
http://www.barnesandnoble.com/w/pro-oracle-fusion-applications-tushar-thakker/1121094340
Correcting Datasource Configuration
Due to Bugs 17075699 and 17076033 in Identity Management Provisioning, you must make changes to the following datasources:
- EDNLocalTxDataSource*
- mds-oim*
- mds-owsm*
- mds-soa*
- oamDS*
- oimJMSStoreDS*
- OraSDPMDataSource*
- SOALocalTxDataSource*
To make the changes, proceed as follows:
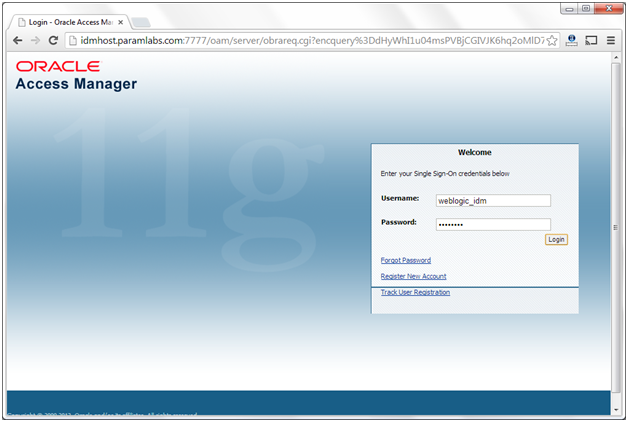
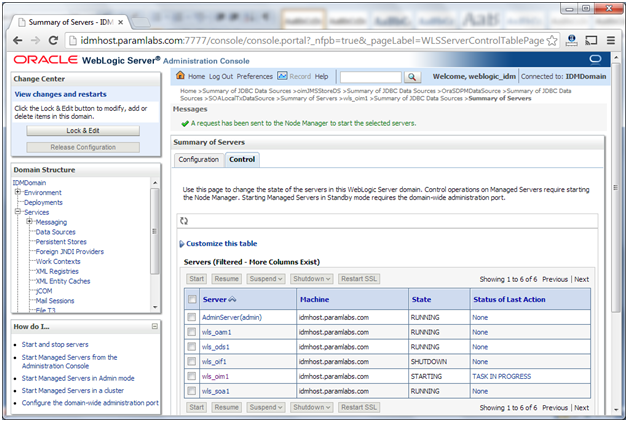
1. Log in to the WebLogic Administration Console at http://idmhost.paramlabs.com:7777/console
Use weblogic_idm username and password which you provided before provisioning.
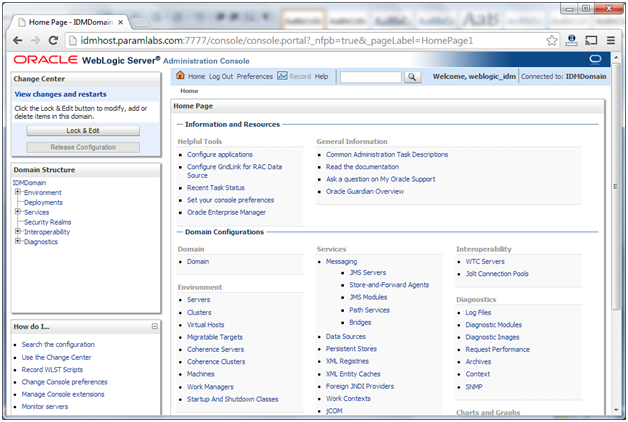
2. Click Lock & Edit.
3. Navigate to Services -> Data Sources
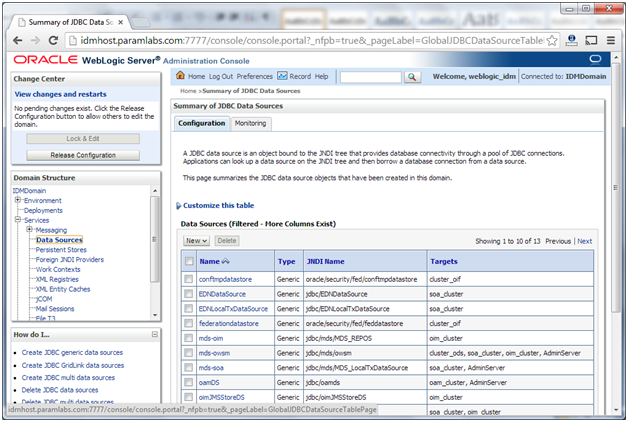
4. Click on the data source to be updated, for example, EDNLocalTxDataSource
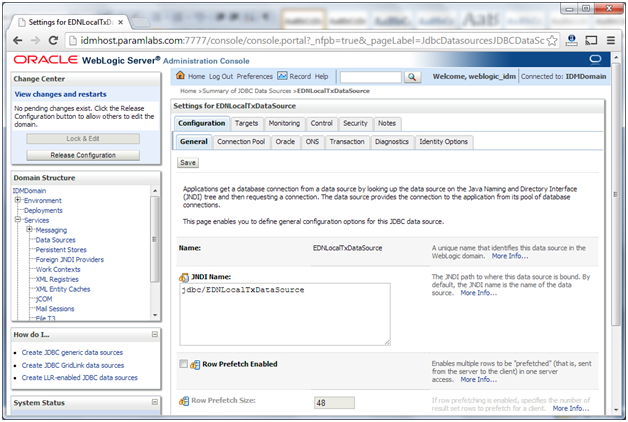
5. Click the Transaction tab
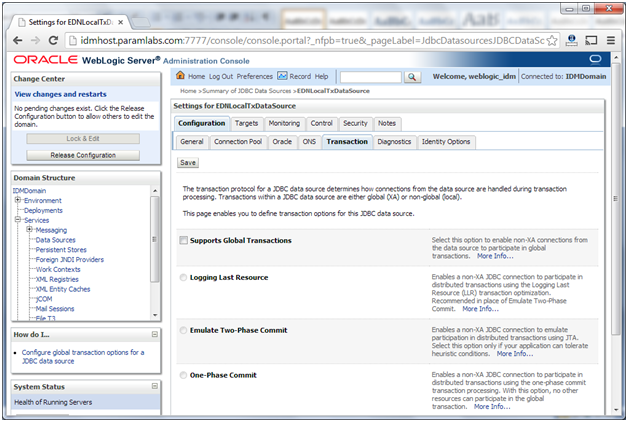
6. Deselect Supports Global Transactions if not already deselected. In our case it is already deselected.
7. Click Save.
8. Repeat Steps 4 through 7 for all the listed datasources.
Note: We had to change the checkbox only or oamDS. All other were already deselected.
9. Click Activate Changes.
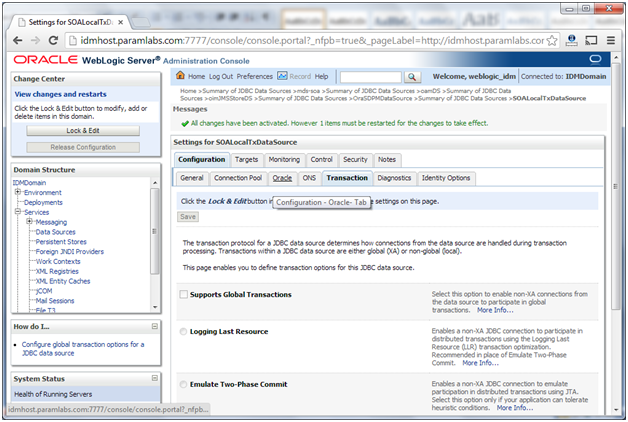
10. Restart all servers.
Updating Oracle HTTP Server Runtime Parameters
By default, the Oracle HTTP Server contains parameter values that are suitable for most applications. These values, however, must be adjusted in IDM Deployments
Proceed as follows:
1. Edit the file httpd.conf, which is located in: WEB_ORACLE_INSTANCE/config/OHS/component_name
[fusion@idmhost ~]$ cd /app/oracle/config/instances/ohs1/config/OHS/ohs1/
[fusion@idmhost ohs1]$ cp -pr httpd.conf httpd.conf.bak
[fusion@idmhost ohs1]$ vi httpd.conf
2. Find the entry that looks like this:
<IfModule mpm_worker_module>
3. Update the values in this section as follows:
<IfModule mpm_worker_module>
ServerLimit 20
MaxClients 1000
MinSpareThreads 200
MaxSpareThreads 800
ThreadsPerChild 50
MaxRequestsPerChild 10000
AcceptMutex fcntl
</IfModule>
4. Leave all remaining values unchanged.
5. Save the file.
[fusion@idmhost ohs1]$ diff httpd.conf httpd.conf.bak
164,169c164,168
< ServerLimit 20
< MaxClients 1000
< MinSpareThreads 200
< MaxSpareThreads 800
< ThreadsPerChild 50
< MaxRequestsPerChild 10000
—
> MaxClients 150
> MinSpareThreads 25
> MaxSpareThreads 75
> ThreadsPerChild 25
> MaxRequestsPerChild 0
1036c1035
< include “/app/oracle/config/instances/ohs1/config/OHS/ohs1/webgate.conf”
—
> include “/app/oracle/config/instances/ohs1/config/OHS/ohs1/webgate.conf”
\ No newline at end of file
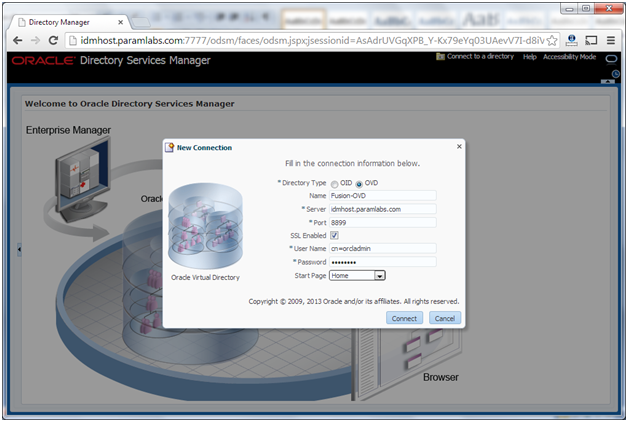
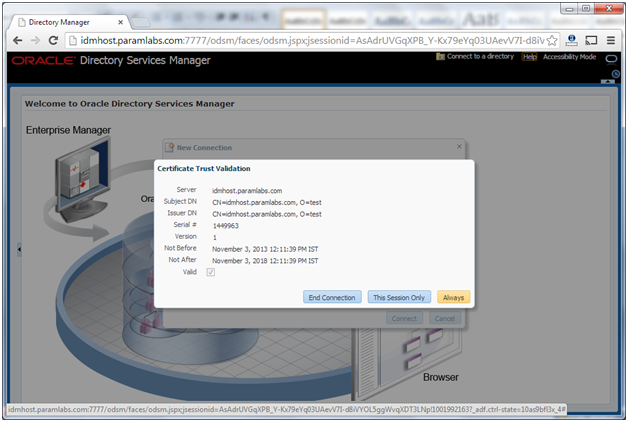
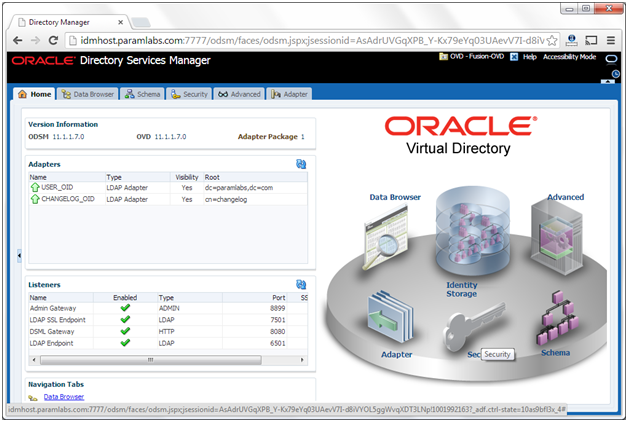
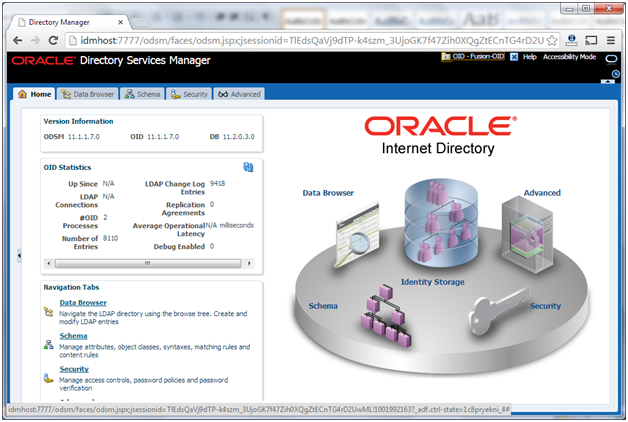
Creating ODSM Connections to Oracle Virtual Directory
Before you can manage Oracle Virtual Directory you must create connections from ODSM to each of your Oracle Virtual Directory instances. To do this, proceed as follows:
1. Access ODSM at: http://idmhost.paramlabs.com:7777/odsm
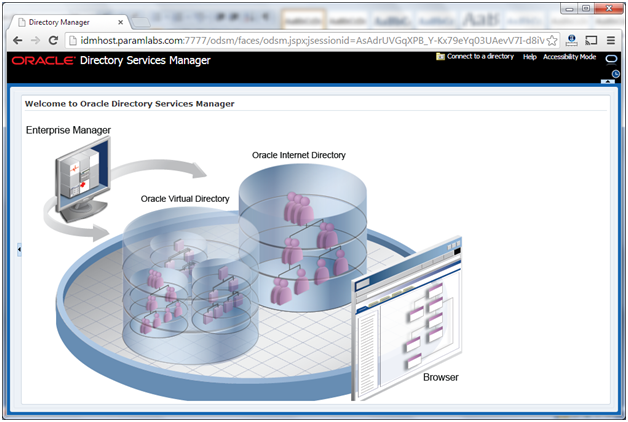
2. Follow these steps to create connections to Oracle Virtual Directory:
To create connections to Oracle Virtual Directory, follow these steps. Create connections to each Oracle Virtual Directory node separately. Using the Oracle Virtual Directory load balancer virtual host from ODSM is not supported:
Create a direct connection to Oracle Virtual Directory on idmhost providing the following information in ODSM:
Host: idmhost.paramlabs.com
Port: 8899 (The Oracle Virtual Directory proxy port, OVD_ADMIN_PORT)
Enable the SSL option.
User: cn=orcladmin
Password: password_to_connect_to_OVD

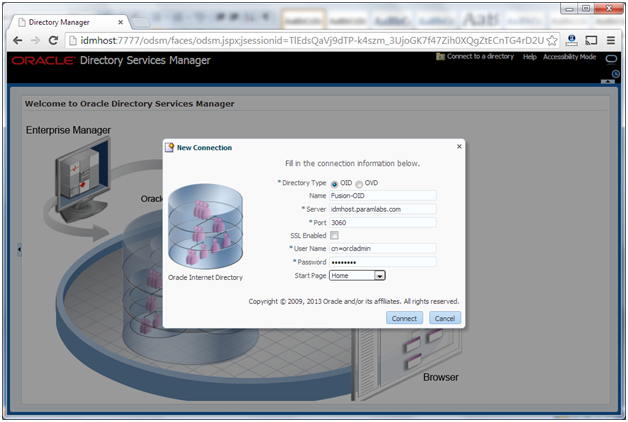
Creating ODSM Connections to Oracle Internet Directory
Before you can manage Oracle Internet Directory you must create connections from ODSM to each of your Oracle Internet Directory instances. To do this, proceed as follows:
1. Access ODSM at: http://idmhost.paramlabs.com:7777/odsm
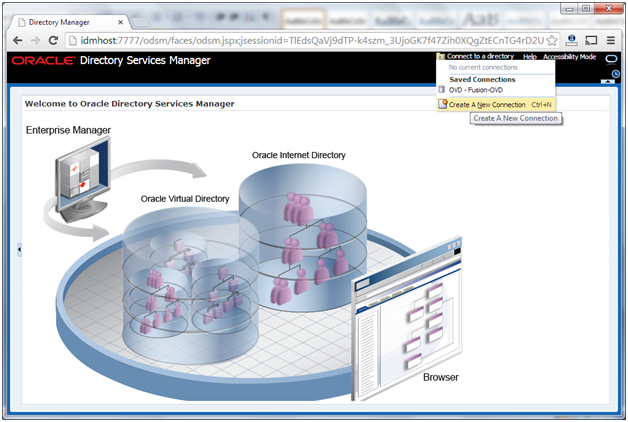
2. Follow these steps to create connections to Oracle Internet Directory:
To create connections to Oracle Internet Directory, follow these steps.
Create a direct connection to Oracle Internet Directory on idmhost providing the following information in ODSM:
Host: idmhost.paramlabs.com
Port: 3060
Deselect the SSL option.
User: cn=orcladmin
Password: password_to_connect_to_OID
Post-Provisioning Steps for Oracle Identity Manager
Perform the following task to ensure that Oracle Identity Manager works correctly after provisioning.
Add an Oracle Identity Manager Property
As a workaround for a bug in the Identity Management Provisioning tools (Bug 16667037), you must add an Oracle Identity Manager property. Perform the following steps:
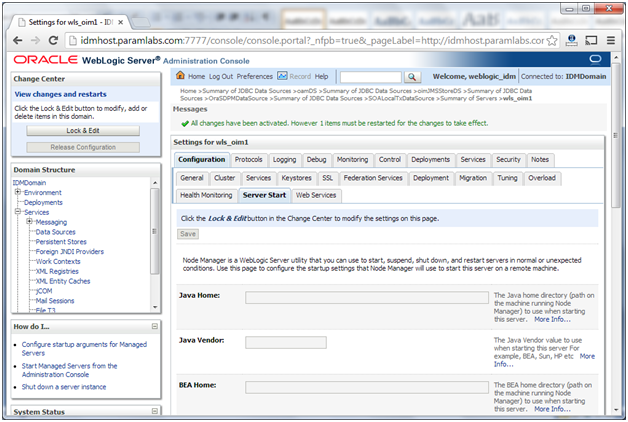
1. Log in to the WebLogic Console.
2. Navigate to Environment -> Servers.
3. Click Lock and Edit.
4. Click on the server wls_oim1
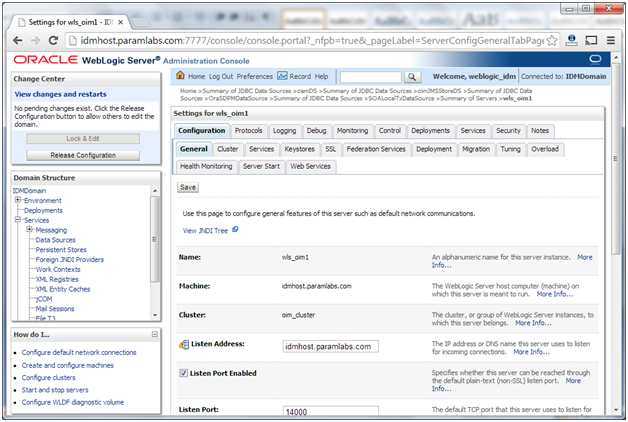
5. Click on the Server Start subtab

6. Add the following to the Arguments field:
-Djava.net.preferIPv4Stack=true
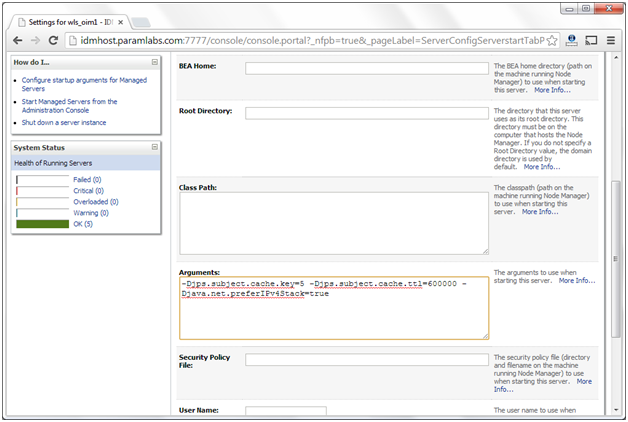
7. Click Save.
9. Click Activate Changes.
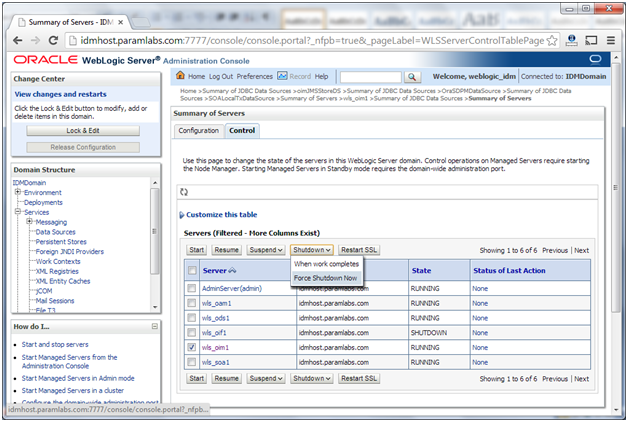
10. Restart the managed server wls_oim1
Post-Provisioning Steps for Oracle Access Manager
Updating Existing WebGate Agents
Update the OAM Security Model of all WebGate profiles, with the exception of Webgate_IDM and Webgate_IDM_11g, which should already be set
To do this, perform the following steps:
1. Log in to the Oracle Access Manager Console as the Oracle Access Manager Administration user (oamadmin)
http://idmhost.paramlabs.com:7777/oamconsole

2. Click the System Configuration tab.
3. Expand Access Manager Settings – SSO Agents.
4. Click OAM Agents and select Open from the Actions menu.
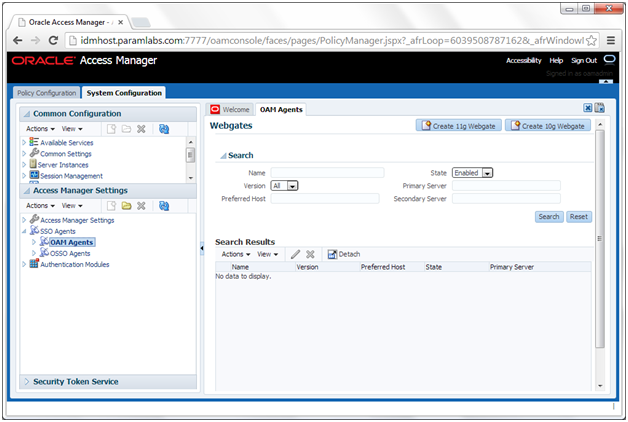
5. In the Search window, click Search.
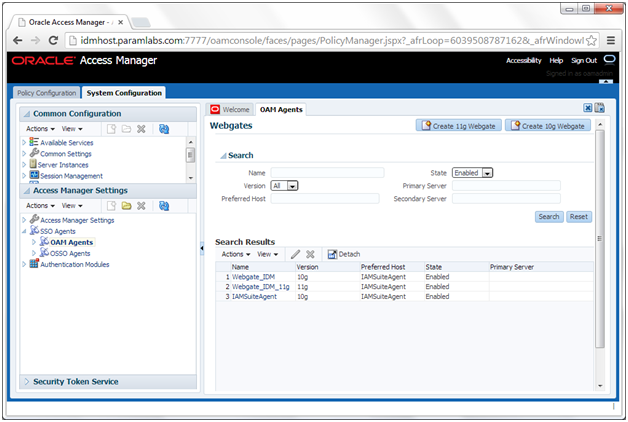
6. Click an Agent, for example: IAMSuiteAgent.
7. Set the Security value to the security model in the OAM Configuration screen of the Identity Management Provisioning Wizard
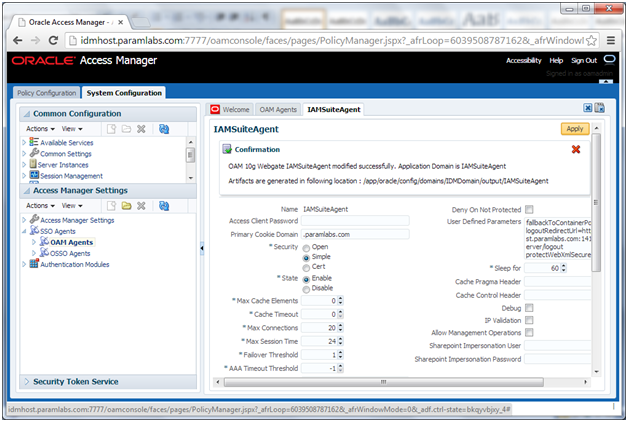
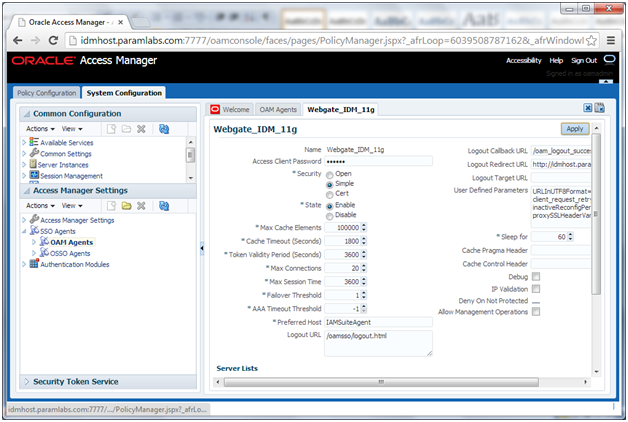
Click Apply.
8. Restart the managed server wls_oam1
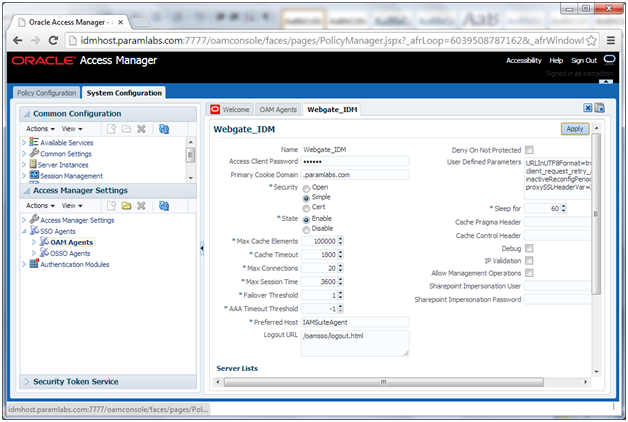
Update WebGate Configuration
To update the maximum number of WebGate connections, proceed as follows.
1. In the Oracle Access Manager Console, select the System Configuration tab.
2. Select Access Manager -> SSO Agents -> OAM Agent from the directory tree. Double-click or select the Open Folder icon.
3. On the displayed search page, click Search to perform an empty search.
4. Click the Agent Webgate_IDM.
5. Select Open from the Actions menu.
6. Set Maximum Number of Connections to 20
7. Set AAA Timeout Threshold to 5.
8. In the User Defined Parameters box, set client_request_retry_attempts to 11.
9. If the following Logout URLs are not listed, add them:
/oamsso/logout.html
/console/jsp/common/logout.jsp
/em/targetauth/emaslogout.jsp
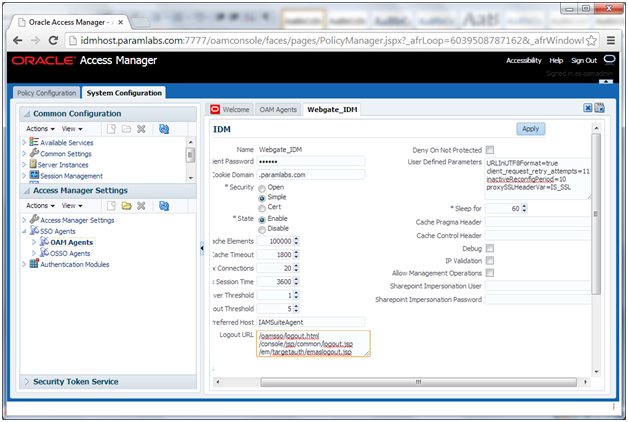
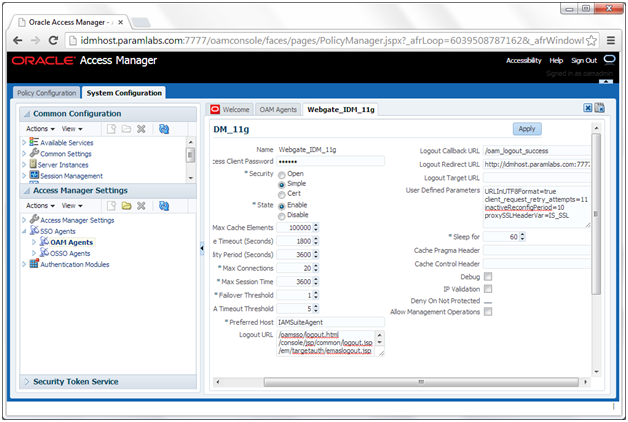
10. Click Apply.
Repeat Steps 4 through 7 for each WebGate
Creating Oracle Access Manager Policies for WebGate 11g
In order to allow WebGate 11g to display the credential collector, you must add /oam to the list of public policies.
Proceed as follows:
1. Log in to the OAM console at: http://idmhost.paramlabs.com:7777/oamconsole
2. Select the Policy Configuration tab.
3. Expand Application Domains – IAM Suite
4. Click Resources.
5. Click Open.
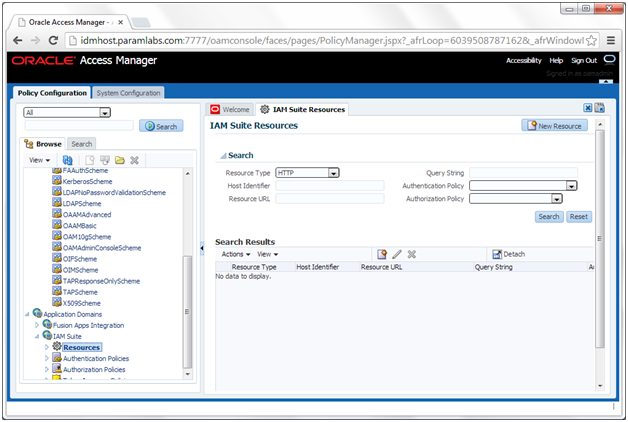
6. Click New resource.
7. Provide the following values:
Type: HTTP
Description: OAM Credential Collector
Host Identifier: IAMSuiteAgent
Resource URL: /oam
Protection Level: Unprotected
Authentication Policy: Public Policy
8. Leave all other fields at their default values.
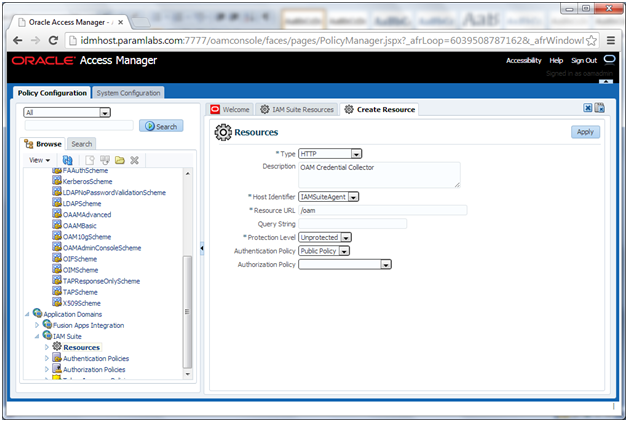
9. Click Apply
Passing Configuration Properties File to Oracle Fusion Applications
[fusion@idmhost ~]$ cd /app/oracle/config/fa/
[fusion@idmhost fa]$ ls -ltr idmsetup.properties
-rw-r–r– 1 fusion dba 3548 Oct 26 02:42 idmsetup.properties
[fusion@idmhost fa]$ cp -pr idmsetup.properties idmsetup.properties.backup
OIF Configuration
OIF is optional and we will skip configuring it
We will also skip “updating node manager for enterprise deployment” since we do not want to configure SSL yet\
Let’s confirm if OID and OHS are running fine.
[fusion@idmhost ~]$ /app/oracle/config/instances/oid1/bin/opmnctl status
Processes in Instance: oid1
———————————+——————–+———+———
ias-component | process-type | pid | status
———————————+——————–+———+———
ovd1 | OVD | 14778 | Alive
oid1 | oidldapd | 15011 | Alive
oid1 | oidldapd | 14999 | Alive
oid1 | oidldapd | 14910 | Alive
oid1 | oidmon | 14780 | Alive
EMAGENT | EMAGENT | 14777 | Alive
[fusion@idmhost ~]$ /app/oracle/config/instances/ohs1/bin/opmnctl status
Processes in Instance: ohs1
———————————+——————–+———+———
ias-component | process-type | pid | status
———————————+——————–+———+———
ohs1 | OHS | 16798 | Alive
Validate OID and OVD
[fusion@idmhost bin]$ ldapbind -h idmhost.paramlabs.com -p 6501 -D “cn=orcladmin” -q
Please enter bind password:
bind successful
[fusion@idmhost bin]$ ldapbind -h idmhost.paramlabs.com -p 7501 -D “cn=orcladmin” -q -U 1
Please enter bind password:
bind successful
[fusion@idmhost bin]$ ldapbind -h idmhost.paramlabs.com -p 3060 -D “cn=orcladmin” -q
Please enter bind password:
bind successful
[fusion@idmhost bin]$ ldapbind -h idmhost.paramlabs.com -p 3131 -D “cn=orcladmin” -q -U 1
Please enter bind password:
bind successful
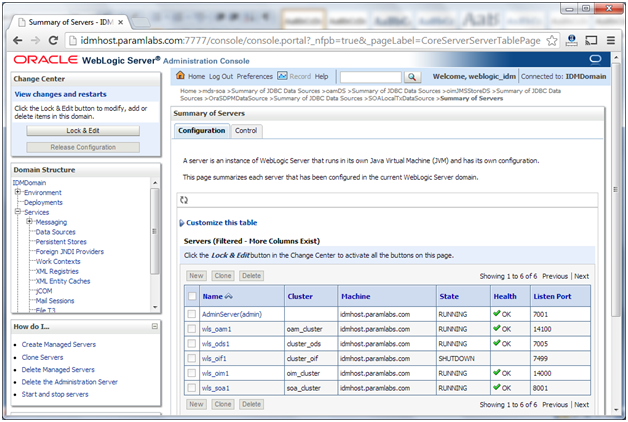
Validate Admin and managed Servers
Login to Weblogic console at http://idmhost:7777/console using weblogic_idm user. Click on Servers.

You can see that all servers except OIF are running. This is default configuration after IDM provisioning since OIF is optional and we will not start it.
Login to Enterprise Manager at http://idmhost:7777/em using weblogic_idm user.
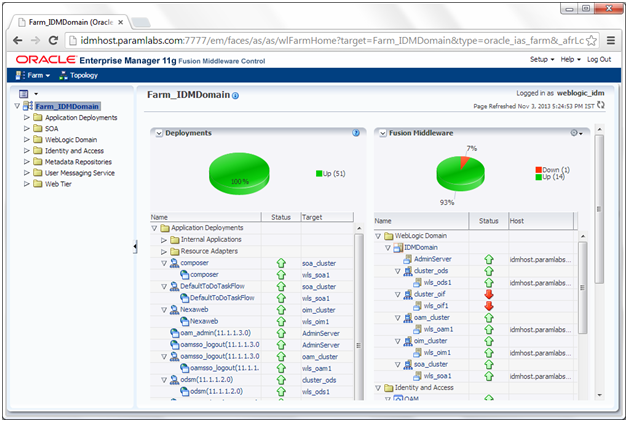
All components except OIF should be green.
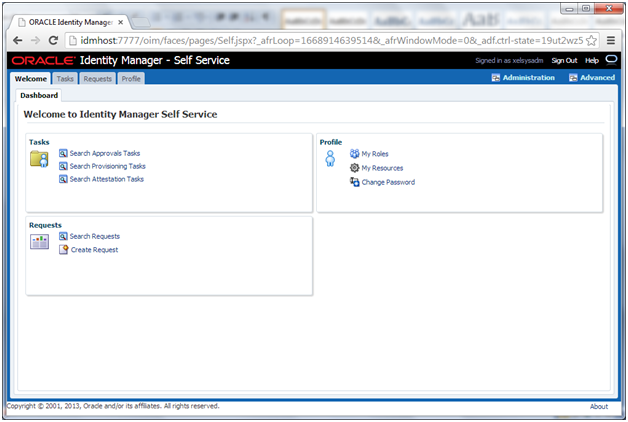
Validate OIM by logging into http://idmhost:7777/oim using xelsysadm user

This concludes our IDM host related setup. We will now move on to Fusion Applications host.
Next: Install Fusion Applications Provisioning Framework on FA Host
Installing Oracle Fusion Applications – steps
A. Setting up Identity and Access Management Node
1. Install Fusion Applications Provisioning Framework
2. Install Oracle 11g Database (Identity management database)
3. Run Repository Creation Utility (RCU) for Oracle Identity Management components
4. Install Identity Management Provisioning Wizard
5. Create IDM provisioning Response File
6. Provision Identity Management
7. Perform Post-Provisioning Configuration
B. Setting up Fusion Applications Node
1. Install Fusion Applications Provisioning Framework
2. Install Oracle 11g Database (Fusion Apps Database)
3. Run Oracle Fusion Applications Repository Creation Utility (Applications RCU)
Tushar,
I followed your example and it worked perfectly. However, can you give me advice on setting up Directory Integration Platform(DIP) in this configuration?
Dear Tushar,
During the step
Post-Provisioning Steps for Oracle Access Manager
Updating Existing WebGate Agents
I shutdown the wls_oam1 from the Weblogic Console.
Not I am getting the following error while opening any of the link related to EM, Console, oamconsole.
Oracle Access Manager Operation Error
The WebGate plug-in is unable to contact any Access Servers.
Contact your website administrator to remedy this problem.
Please let me know how to restart the wls_oam1.
I followed oracle support and found one solution but it is not working.
MSERVER_HOME/bin/startManagedWeblogic.sh WLS_OAM1 t3://idmhost.paramlabs.com:7777
weblogic username: weblogic_idm
password: Oracle123
Kindly help me on the following issue.
Many thanks
Dear Tushar,
I followed your below guide and the issue is sorted out… Thank you again
http://www.oratraining.com/blog/2012/11/startup-shutdown-sequence-for-oracle-fusion-apps-components/
Rahul
nohup/bin/startManagedWeblogic.sh wls_oam1 & (mind the smallcase)
Sorry for the short reply due to long list of pending comments. pls let me know if it does not work
Dear Tushar,
I completed all the phase with out any error, I am trying to login in console getting following error.
URL :http://192.168.1.112:7777/console
Oracle Access Manager Operation Error
No message for The Access Server has returned a status that is unknown to the AccessGate .
Contact your website administrator to remedy this problem.
If I specified instead of IP with host name
URL: http://idmhost.fugodba.com:7777/console
This webpage is not available
I need to edit any files to work out?
Thanks for the sharing!
I was wondering why I cannot logging the oim design coonsole?
Hi Tushar ,
My Fusion instance very very slow .how to resolve the ,please help me.
Hi Tushar,
I finished the provisioning and did the changes on correcting the datasource configuration. After that you mentioned to restart the servers. I did the following.
Started WebLogic
nohup ./startManagedWebLogic.sh WLS_OAM1 &
nohup ./startManagedWebLogic.sh wls_ods1 &
nohup ./startManagedWebLogic.sh WLS_OIM1 &
nohup ./startManagedWebLogic.sh WLS_SOA1 &
Now I am unable to go into http://fusion:7777/console… it is no more recognized. All I could get is http://fusion:7001. WebLogic Server is working and starting.
Can you let me know what I made as error.
Regards,
Anand
Dear Anand,
Port 7777 is for the web server. Please make sure that the web server is started in order to use this URL.
Regards
Tushar
hi Tushar,
i have also faced the same issue, i stopped WLS_OAM1
now i need to start it, can you let me know how to start it from linux terminal
Regards,
Sidharth Mahajan
Dear Sidharth,
You can find the steps at my following post.
http://www.oratraining.com/blog/2012/11/startup-shutdown-sequence-for-oracle-fusion-apps-components/
Regards
Tushar
Dear Tushar,
Thank you so much, I have successfully started the OAM.
Regards,
Sidharth Mahajan
Dear tushar
when i run ldapbind -h idmhost.paramlabs.com -p 3060 -D “cn=orcladmin” -q -U 1
it succeed but when i run
ldapbind -h idmhost.paramlabs.com -p 7501 -D “cn=orcladmin” -q -U 1
it give me ldap_bind: invalid credential
ldap_binf: additional info: Anonymous bind disable
and when i run
ldapbind -h idmhost.paramlabs.com -p 7501 -D “cn=orcladmin” -q -U 1
or
ldapbind -h idmhost.paramlabs.com -p 3131 -D “cn=orcladmin” -q -U 1
it give me ldap_bind: local error
any suggest ?
Dear Magdy,
Your first command shows clear error message that you entered invalid credentials while validating. Please try again with correct password and it will work fine. Second set has again same command listed so kindly revisit the comment you posted. The last one is not correct port so ignore it.
Regards
Tushar
Dear Tushar
thank you very much for your fast response
i followed your steps exactly so in this case i should use the Oracle123 as password or there is another one
Yes whichever password you have selected during installation. We had selected Oracle123 and Param123 in different installations on this blog. You enter whichever you had selected.
Dear Tushar
i removed the OVD connection and created it again
it solve the problem for
ldapbind -h idmhost.paramlabs.com -p 6501 -D “cn=orcladmin” -q
but
ldapbind -h idmhost.paramlabs.com -p 7501 -D “cn=orcladmin” -q
still giving error ldap_bind: local error
No issues. Go ahead with the installation. You are going to use 3060 only anyway.
thank you very much tushar
Dear tushar
sorry for the mistake in port NO it is 6051
when i run ldapbind -h idmhost.paramlabs.com -p 3060 -D “cn=orcladmin” -q -U 1
it succeed but when i run
ldapbind -h idmhost.paramlabs.com -p 6501 -D “cn=orcladmin” -q -U 1
it give me ldap_bind: invalid credential
ldap_binf: additional info: Anonymous bind disable
and when i run
ldapbind -h idmhost.paramlabs.com -p 7501 -D “cn=orcladmin” -q -U 1
it give me ldap_bind: local error
i tried to log in http://idmhost.dohacables.com:7777/oamconsole from remote computer give me :
Access Denied
Access to administration console is restricted.
when tried it from the server it open the console but when i tried to log in using the username oamadmin and password Oracle123 it give me error :
An incorrect username or Password was specialied
Since IDM domain has SSO configured, if you are logged in to admin server or any other application then it might continue to use the same credentials when you open other consoles. For this, either login to the already logged-in console and logout before you launch oamconsole and if you don’t know where you are already logged on, just use http://:7777/oamsso/logout.html to manually logout.
For oamconsole use the passord which you have given during installation since Oracle123 is the password used by us during installation (11.1.6) and we used password Param123 for 11.1.7 but you could have specified other password.
– Tushar
thank you tushar for your time and support
i followed your installation steps exactly but i still facing problem to log in oam due to the the password , according your steps what is the password which i should use to log in the oam console with the username oamadmin
Dear Magdy,
In 11.1.6 we had manually created admin.conf but here the configuration file name will be different since it is automatically generated as part of the IDM provisioning. Also since you earlier got Apache bridge error, it means it was able to resolve odsm even with 7777 port but was not able to redirect since service was not properly started. Have you tried same thing again after restarting ODSM? You can also double-check for ODSM entry in the config files located in moduleconf directory
Regards
Tushar
i can’t log in http://idmhost.paramlabs.com:7777/odsm
it give me the following error
Failure of server APACHE bridge:
No backend server available for connection: timed out after 10 seconds or idempotent set to OFF or method not idempotent.
i can’t log in http://idmhost.paramlabs.com:7777/odsm
it give me the following error
Failure of server APACHE bridge:
No backend server available for connection: timed out after 10 seconds or idempotent set to OFF or method not idempotent.
It means your HTTP server is fine but the main ODSM managed server is not running.
Try opening http://idmhost.paramlabs.com:7006/odsm to whether the server loads without HTTP alias.
If not then you may need to start ODSM service through Admin server console at http://idmhost.paramlabs.com:7777/console or using command line
– Tushar
thank you ….. it is open with the link http://idmhost:7005/odsm
but how can i open it with http://idmhost.paramlabs.com:7777/odsm
do i need to change something in admin.config like in version 11.1.6